
GPIO Demo
GPIO demo package
info-beamer OS (from version 10) has support for GPIO access. The package sdk makes it easy to read GPIO values from your Python package service. This package demonstrates this in a minimal way: Pressing a physical button toggles the screen color from red to green. Here's the wiring you'll need and how it works:
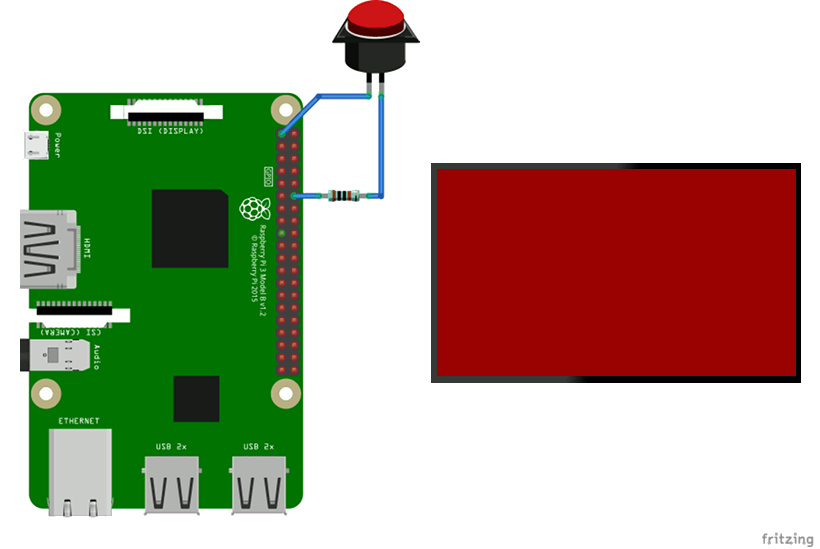
The button connects the 3.3V output PIN to GPIO18 of your Pi via a 1KΩ resistor.
How this package works
All info-beamer packages contain multiple files that together control how to configure a package, how it runs background tasks on a device and what is shown on the screen. Here's all files needed for the GPIO demo.
node.json file
This package only has a single configuration option named pin.
The follow snippet shows the complete
node.json file (reference documentation).
{
    "name": "GPIO Demo",
    "permissions": {
        "gpio": "Access GPIO"
    },
    "options": [{
        "title": "PIN",
        "ui_width": 4,
        "name": "pin",
        "type": "integer",
        "default": 18
    }]
}
It specifies that this node wants access to
gpio
and defines a
configuration option
named pin as an
integer
with a default value of 18.
service file
The package service, bundled as the file service in this package,
looks like this:
#!/usr/bin/python
from hosted import device, node, config
config.restart_on_update()

device.gpio.monitor(config.pin)
for pin, state in device.gpio.poll_forever():
    node.send('/state:%d' % state)
This file is executed on any device you install this package on. It
runs forever and is automatically restarted by the info-beamer OS
if it terminates for any reason.
The code imports the
info-beamer package sdk
from hosted.py. The config class will automatically be populated with
the configuration values set by the user. Right now only pin can be
configured and the value set by the user is available in config.pin.
The config.restart_on_update() line tells the package sdk to
automatically restart the service every time the configuration changes.
So if the user changes the PIN value from 18 to (for example) 17, the
Python process will exit and is automatically restarted by the
info-beamer OS.
Next we set up a GPIO monitor for the configured PIN using the
device.gpio.monitor call. The for loop then forever loops and
returns a new observation in every loop.
Inside the loop we get a state value each time. True if GPIO is
high, False if it is low. We immediately send this value to the
running info-beamer code in node.lua (see below). Since we convert
the boolean state value to a numeric value with %d it is converted
to either 1 or 0. The node.send call internally sends a UDP packet
to the info-beamer process with the following content assuming this
package is the top-level node (/root) in your setup:
/root/state:0
or
/root/state:1
node.lua
The node.lua file is responsible for controlling the content of the screen. Here's the complete file:
gl.setup(NATIVE_WIDTH, NATIVE_HEIGHT)

local on = false

util.data_mapper{
    state = function(state)
        on = state == '1'
    end,
}

function node.render()
    if on then
        gl.clear(0, 1, 0, 1) -- green
    else
        gl.clear(1, 0, 0, 1) -- red
    end
end
The variable on decides if we clear the screen in green or red: You can see
how this decision is made in the node.render function at the bottom. The
node.render function is usually called 60 times per second and is responsible to
creating the screen outout.
The util.data_mapper
receives incoming UDP packets (remember we send them in the package service above)
and decides how to react the them. The value state matches to the node.send call
from above. Its callback function receives the value sent: In our case we sent
either 0 or 1 (see above). So we test for that and update the on variable accordingly.
That's all. You can install this package on your info-beamer devices and can see how the screen turns green while the button is pressed.
Want to run GPIO Demo on your Raspberry Pi?
This package is ready to run on your Raspberry Pi using info-beamer.com hosted. Easily manage unlimited number of Raspberry Pi devices and centrally configure and run visualizations like this on them. info-beamer.com is a prepaid service. You only pay for the resources you are using. No long term commitment, no hidden fees. Learn more...
Compatible devices
pi-1 pi-2 pi-3 pi-4 pi-5 pi-cm0 pi-cm1 pi-cm3 pi-cm4 pi-cm5 pi-zero pi-zero-2Offline support
Maybe This package might work offline: Package provides no offline support information. Also check the information above.Source code for this package
https://github.com/info-beamer/package-gpio-demo shows you the full source code of this package so you can freely modify it if you want.Copyright
Copyright (C) 2018 Florian Wesch <fw@info-beamer.com>
Show full license information
Copyright (C) 2018 Florian Wesch <fw@info-beamer.com>

Permission is hereby granted, free of charge, to any person obtaining a copy
of this software and associated documentation files (the "Software"), to deal
in the Software without restriction, including without limitation the rights
to use, copy, modify, merge, publish, distribute, sublicense, and/or sell
copies of the Software, and to permit persons to whom the Software is
furnished to do so, subject to the following conditions:

The above copyright notice and this permission notice shall be included in
all copies or substantial portions of the Software.

THE SOFTWARE IS PROVIDED "AS IS", WITHOUT WARRANTY OF ANY KIND, EXPRESS OR
IMPLIED, INCLUDING BUT NOT LIMITED TO THE WARRANTIES OF MERCHANTABILITY,
FITNESS FOR A PARTICULAR PURPOSE AND NONINFRINGEMENT.  IN NO EVENT SHALL THE
AUTHORS OR COPYRIGHT HOLDERS BE LIABLE FOR ANY CLAIM, DAMAGES OR OTHER
LIABILITY, WHETHER IN AN ACTION OF CONTRACT, TORT OR OTHERWISE, ARISING FROM,
OUT OF OR IN CONNECTION WITH THE SOFTWARE OR THE USE OR OTHER DEALINGS IN
THE SOFTWARE.


This project includes third party work:

package.png:
    CCBY by Marie Van den Broeck (https://thenounproject.com/marie49/)
    https://thenounproject.com/term/electronics/381125/
