
Building Packages
Overview
A package on info-beamer.com is a the smallest unit of software that is intended to run on a device. A package consists of Lua code that controls what's displayed on the screen, an optional service file that can do any kind of background task required. Finally a packages contains meta information about possible configuration options and about the package itself.
Packages are imported into info-beamer.com. info-beamer.com can import a package from a ZIP archive, list of URLs or from a git repository. All type of sources are specified as a url and except for the git import must be publicly reachable for info-beamer to fetch. Additionally you can use git based package on info-beamer.com which you can git push to.
My first package
Let's create a new package. Each package must contain a file called node.lua. This file is executed by the program info-beamer pi on your device and controls what's displayed on the screen. To learn more about what's possible take a look at info-beamer documentation. To run your code without using the additonal services and convenience of info-beamer.com take a look at the info-beamer pi download page.
A Hello World
For a basic "hello world" you just need two files: A font file (font.ttf) and an info-beamer script (node.lua) that uses this font to write on the screen.
The most basic info-beamer node.lua code uses a font to write "hello world" on the screen. It uses the gl.setup to set up the screen, the resource.load_font function to load a TTF font file and finally font.write to render text on the screen:
gl.setup(NATIVE_WIDTH, NATIVE_HEIGHT)

local font = resource.load_font "font.ttf"

function node.render()
    font:write(250, 300, "Hello world", 64, 1,1,1,1)
end
This code is runnable using the standalone program info-beamer pi. To make it run on info-beamer hosted you need three additional files.
Adding package information
Your package needs a package.json file that contains some information about your package. The file is json formatted. It must look like this:
{
    "name": "Hello world",
    "author": "Florian Wesch <fw@dividuum.de>",
    "desc": "A hello world"
}
The name is the name of the package. It should contain a brief name of your package. The author should contain a name that describes who created this package. Finally the desc field should give a brief description about your package.
Adding node information
A package can consist of nested directories that work together to provide some visualisation. In the info-beamer context each directory is referred to as a node. For our simple "hello world" example that's not needed. The single top-level node containing the node.lua file is sufficient.
Each node of your package may contain a file node.json that specifies some information about the node. The node.json file is optional for nested nodes. For the top-level node the file is mandatory.
The node.json file for our "hello world" example looks like this:
{
    "name": "Hello World Node",
    "options": []
}
name specifies the name of this node. options specifies possible configuration options for that node. Right now it's just an empty list [].
Adding a package icon
To make the presentation of a package look better on info-beamer hosted, each package requires a small image file package.png. The file must be in PNG format and must be 64x64 pixel. Here's an example of what our package icon might look like:

Configuration options
One major feature of info-beamer hosted is that you can easily create a configuration interface for your code. This allows users of your package to specify behaviour of your package without changing code.
Let's create some options for the "hello world" example.
Extending node.json
The first thing we want to make configurable is the text displayed. By default it should still display "hello world" but we want a configuration option for that. To do that, we extend the node.json file with a string option:
{
    "name": "Hello World Node",
    "options": [{
        "title": "Text",
        "name": "text",
        "type": "string",
        "default": "Hello world"
    }]
}
The "options" list now contains a new object. Its "title" will be displayed in the configuration menu. "name" is the name of this option. We call it "text". The "type" value specifies the type of the option. There are many different types available. Since we want to change a string option we use "string" as "type" here.
The "default" value specifies a default value that's used if you create a new setup based on this Package.
info-beamer hosted will automatically create a graphical configuration interface based on your node.json file. In this case the configuration interface will look like this:
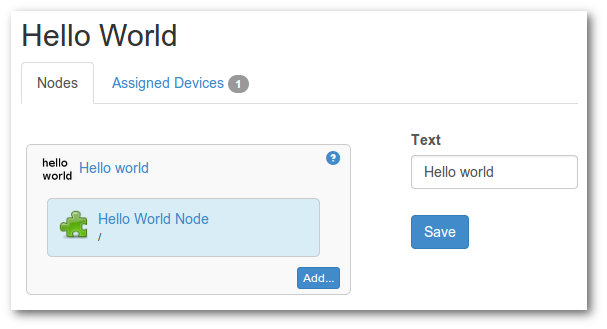
Using the options in node.lua
If you create a new setup based on this package now you'll see the option. By default we'll see the default text "Hello world".
Extend the file node.lua like this:
gl.setup(NATIVE_WIDTH, NATIVE_HEIGHT)

local font = resource.load_font "font.ttf"
local text = "Hello World"

util.json_watch("config.json", function(config)
    -- called each time the configuration is changed. 'config'
    -- contains new current configuration values set by the user.

    text = config.text -- assign configuration 'text' value to 'text' variable
end)

function node.render()
    gl.clear(0,0,0,1)
    font:write(250, 300, text, 64, 1,1,1,1) -- use the CONFIG value
end
You'll see a new function call util.json_watch. This call sets up an event handler that is called each time the file config.json gets updated.
In the font:write call you'll see that new variable in action: The text variable will contain the string value the user of your package specified in the options.
Using your new package
Import your new package into info-beamer hosted. You can do this in four different ways described in the following sections.
Alternatively you might also speed up initial development of a package by using the dev-mode utility to directly push your changes to a device. See the linked page for more information on how that works.
Package as a ZIP file
You can bundle your package directory into a zip file that contains all the files. If you're using Linux this might work like this:
user:~/src/helloworld$ zip hello.zip *
  adding: font.ttf (deflated 67%)
  adding: node.json (deflated 9%)
  adding: node.lua (deflated 18%)
  adding: package.json (deflated 22%)
  adding: package.png (stored 0%)
user:~/src/helloworld$ ls -l *.zip
-rw-rw-r-- 1 user user 7943 Jul 14 12:07 hello.zip
user:~/src/helloworld$
Instead of adding all files as top level entries in the ZIP archive you can also zip up a single directory containing those files instead. So this would also work:
user:~/src$ zip hello.zip helloworld
  adding: helloworld/font.ttf (deflated 67%)
  adding: helloworld/node.json (deflated 9%)
  adding: helloworld/node.lua (deflated 18%)
  adding: helloworld/package.json (deflated 22%)
  adding: helloworld/package.png (stored 0%)
user:~/src$ ls -l *.zip
-rw-rw-r-- 1 user user 7943 Jul 14 12:07 hello.zip
user:~/src$
Then upload your package to any static webserver. The zip file has to be publicly reachable so it can be retrieved by info-beamer hosted. Go to the package page. Select "Create from Url...". Then enter the url where info-beamer hosted can download your zip file.
The url should look something like this:
https://example.com/hello.zip
info-beamer hosted will now try to import your package. If successful you'll see the package page with information about your new package. If you get an error, see the troubleshooting guide.
This might be the easiest way to build a package if you just started.
The imported ZIP file cannot exceed 384MB in size.
Package in 'package link' format
If you want to import a package consisting of files stored in various locations you can use the 'package link' importer. The urls of your package must looks something like this:
https://example.com/path/package.links
It is important to use the package.links filename, otherwise info-beamer won't detect your package. You can of course dynamically create the file's content upon request.
Your package.links file must return text content of the following format:
[info-beamer-package]
# some comment
node.lua https://example.com/path/node.lua
config.json data:application/json;base64,eyJmb28iOiAiYmFyIn0=
hello.txt https://example.com/path/hello.txt md5:5eb63bbbe01eeed093cb22bb8f5acdc3

test.png https://info-beamer.com/favicon.ico
...
Lines must be split by \n. The first line must contain the string [info-beamer-package]. All following lines can be empty, start with a # in which case they are ignored or must contain a file description consisting of the imported filename as well as the url from where to fetch the file. Optionally additional metadata can be appended to a line. See below.
JSON files up to a size of around 48KB can be provided inline using data URIs: Use the prefix data:application/json;base64, and append BASE64 encoded JSON content. This makes it easier to dynamically generate your package links file with required content and associated configuration files as it avoids the race condition between retrieving the package.links file and any linked JSON configuration.
When downloading linked files, info-beamer will honor usual HTTP file caching semantics to minimize the amount of data downloaded. Unchanged files will usually only be downloaded once. Make sure to correctly set the ETag and Last-Modified header for that.
Files that will never change in the future can additionally return a Cache-Control: immutable header. This will allow info-beamer hosted to skip the validating HTTP request completely when updating a package.
It is possible to provide an optional MD5 checksum of the linked content. The importer will use this to both check that the retrieved content matches the provided checksum as well as to allow the importer to skip downloading content altogether if the same matching content is already cached locally by a previous importer run.
Once all files were retrieved info-beamer hosted will import this package. If you get an error, see the troubleshooting guide.
The total imported size cannot exceed 4GB or 2048 individual files.
Package pulled git repository
Add your package files to a git repository. The repository must be reachable by info-beamer hosted. You can use deployment keys, so your repository doesn't have to be public.
git lfs (Large File Storage) is NOT supported.
user:~/src/helloworld$ git init
Initialized empty Git repository in ~/src/helloworld/.git
user:~/src/helloworld$ git remote add origin http://example.net/helloworld.git
user:~/src/helloworld$ git add *
user:~/src/helloworld$ git commit -m "initial commit"
[..]
user:~/src/helloworld$ git push origin master
[..]
user:~/src/helloworld$
Then go to the Package list page and enter the url of your git repository. This might be one of:
git://example.net/helloworld.git
http://example.net/helloworld.git
https://example.net/helloworld.git
ssh://git@example.net/helloworld.git
The git:// and http:// protocols are unauthenticated and not encrypted. Do not use them unless you have to. Use ssh:// or https:// instead.
When using SSH, info-beamer hosted will connect as a user with the an SSH key pair with the following public key by default:
ssh-rsa AAAAB3NzaC1yc2EAAAADAQABAAABAQCkG/f3K+gxo26L/iU64jFv40+c6ajCsmhLJxWOV99XySO05RGPstPlYNfV9cFkJEbwMORiGSAXH4r4HoAPj+Ln4Jr9lXwO9LxU0M/1Z4UVwwVYiVL+NvjnGqqeynYsDTs2F0Twkebr5X3yzhlb4SWHR8IHL37hb/EkTULURwUhDith/ZqCM7TNPZIsEqT1DLBdISxX9ZXrICcpnMSCaH0F0EoRQ4V4NcerPm/Yzp5QfHxbpEz4VOmH0Q5GFKEWPOYkBBhCWkRwqk1xXPljZwtuWzYFu4VBXSsj0bNsYa2cW9dLG5SxPz2BmtdIhcmWGiVcHHWHvBzBIs7HAeCxqgI/ info-beamer hosted importer key
If your git hosting provider supports deployment keys you can add this key to your repository. See github, bitbucket or gitlab for documentation on how you can do this. Once the key is added, info-beamer hosted will be able to clone your package from a private repository so you don't have to make your repository public.
Using the shared SSH public key will also allow other users to import your package if they know the package source url. Use custom SSH keys if you want to avoid this. See below.
Some provides do not allow you to add the same deployment key to multiple repositories. In that case you can use the SSH keys feature. With it you can use the SSH keys feature of your access management page to create custom keys and use those when creating a new git pull based package. See the ssh_key_id parameter of the package create API call.
By default the master branch is imported. If you want to import a different branch, specify it like this:
https://example.net/helloworld.git#testing
If you get an error, see the troubleshooting guide.
The total imported size cannot exceed 4GB or 2048 individual files.
Package as a hosted git repository on info-beamer.com
You can create a new empty git repository on info-beamer hosted. You edit your files locally, commit to a local git repository and then finally push it to info-beamer.com.
You can match this using the Action value in a policy statement. Example JSON policy allowing this call:
{
  "Statements": [
    {
      "Action": "package:update:push",
      "Effect": "allow"
    }
  ],
  "Version": 1
}
The policy can be made more specific using the following values within a
Condition evaluator:
| Context value name | Type | Description |
|---|---|---|
| package:id | Numeric | The package id |
| package:source | String | The package source or null in casse of a git pushed package. |
This is fastest workflow if you are familiar with git. Create a local repository
user:~/src/helloworld$ git init
Initialized empty Git repository in ~/src/helloworld/.git
user:~/src/helloworld$ git add .
user:~/src/helloworld$ git commit -m "initial commit"
Then add info-beamer.com as a remote. If you push the master branch to that repository info-beamer hosted will update the package and push changes to all running setups that use this package. So updating live content is just one push away:
user:~/src/helloworld$ # Replace 123 with the repository id assigned to your repository
user:~/src/helloworld$ git remote add info-beamer https://info-beamer.com/package/123.git
[..]
user:~/src/helloworld$ git push info-beamer master
Counting objects: 5, done.
Delta compression using up to 4 threads.
Compressing objects: 100% (3/3), done.
Writing objects: 100% (3/3), 298 bytes | 0 bytes/s, done.
Total 3 (delta 2), reused 0 (delta 0)
remote: Git pack received
remote: Comparing to previous revision
remote: 1 files updated. 14264 bytes changed.
remote: Now uploading changed files...
remote: Upload completed.
To https://info-beamer.com/package/123.git
   ded96a8..52cd094  master -> master
user:~/src/helloworld$
git lfs (Large File Storage) is NOT supported.
Before you can push your have to update your $HOME/.netrc file so the push can use your info-beamer hosted API key for authentication. Just add the following lines:
machine info-beamer.com
password <your API key>
It is highly recommended to use a scoped API key with limited access for this instead of your default API key. You can create a new access for your account and use the 'Package push sync access' ACL for that.
Note that you can only push to this repository. So you can't pull. Use services like github or bitbucket.org to host the primary version of your repository. The primary reason that git pull is not possible is that we might remove locally stored repositories if they haven't been used in a while. A new git push will fully sync back everything, but a git pull might fail under those circumstances. So we opted to disabled pulls completely to avoid confusion.
info-beamer.com is NOT a repository hosting service. It is *NOT* possible to pull from info-beamer hosted. git is only use as a convenient transport to get your data to info-beamer.com. Always have another repository somewhere else to host your code.
Updating a package
If you make changes to your package you can update your previously imported package. Just go to the package information page and click the "Check for updates" button. info-beamer hosted will then probe the package source url and import new or changed files. If you want to automate things, you should create a new API key restricted to package updating and trigger the Package Update /sync API call.
If the package you're updating is used in a Setup info-beamer will instantly sync your devices so the package is up to date on all your devices. To avoid breaking your running devices you can import your package a second time and create a Setup based on it to test updates. Once you're sure that your new package works you can update the primary package.
Updating a ZIP package
Just repack all package files into a new zip file and upload it again. info-beamer hosted will detect that the zip file changed and will read and import files from it.
Package in 'package link' format
When updating the package info-beamer hosted will first fetch the package.links file. info-beamer hosted will then revalidate existing files and fetch new files automatically. It will use Last-Modified and ETag headers to minimize the amount of data downloaded. Additionally you should mark files that will never change in the future with a Content-Control: immutable header. This will allow info-beamer hosted to skip the HTTP request usually required for revalidating content.
Updating a pulled git repository
Just click update. info-beamer hosted will pull all changes and import them.
Updating a hosted git repository
Just push your new version to the repository. info-beamer will fetch the latest version and import changed files. If there are any problems in your pushed repository (like syntax errors), info-beamer hosted will show an error message. If there is any error, nothing will be imported and you have to fix the problem and push again.
Single click install button
If you want to publish a Package to a site like github you can add an

Just add the following markup to your README.md file and adjust the url parameter to point to your package source:
[](https://info-beamer.com/use?url=http://example.com/your/package.git)
On the package documentation page the button itself will be invisible. So it is only shown to users when they visit your repository page.
In an HTML file you can use
<a href="https://info-beamer.com/use?url=http://example.com/your/package.git">
  <img src="https://cdn.infobeamer.com/s/img/import.png" title="Install package">
</a>
Make sure to set the url parameter to the url where info-beamer hosted can fetch your package. Just use the same url you would use if you manually install the Package through the Add Package button on the package list page.
You have to fullfill a few conditions before the single click install button works:
- The package has to be at least been imported once into info-beamer hosted. So you have to import your own package into your account before other users can import the package through the button.
- While info-beamer hosted tries to be smart, you should provide the exact exact same url parameter value you used while manually adding the package to your account. If you don't add the url parameter, info-beamer hosted will use the referrer value instead. This of course won't work if users disable them in their browser.
Troubleshooting
If a package is imported or updated, info-beamer hosted will verify that it is syntactically correct and all required files are available. Visit the package reference to learn more.
The file node.json is checked to make sure that all specified options are correct and default values fit the required type. All Lua files are syntax checked.
To see what your device is doing activate SSH and then take a look at the log file.
