
Package Reference Guide
Overview
info-beamer.com can manage, configure and distribute specially crafted info-beamer.com packages. Packages are just a bunch of files packaged together. If you ever build a info-beamer visualization before, there are only a few files you have to add before info-beamer.com can run it. See the Building packages introduction to get an overview.
This Reference guide will describe all files that are required for a working info-beamer.com package.
Package files
A package consists of one directory with optional additional nested directories. Those directories create a nested set of nodes that the info-beamer player will the use to display screen content. If you create a package without any configuration you'll be instantly able to play it using the info-beamer pi player.
info-beamer.com extends this file layout by a few additional files that enable info-beamer.com to build a configuration interface for you that makes it easy to manage the configuration of your package. Those file and their content are described in this reference guide. The description format for JSON content is borrowing ideas from the jq tool.
Example directory content that creates a minimal package:
package.json
package.png
node.json
node.lua
See below for a description of each individual file and other optional files. The combined size of all package files cannot exceed 4GB. In case of ZIP file imports, the size of the ZIP file cannot exceed 384MB. The maximum number of files within a single package cannot exceed 2048.
package.json
The top-level directory of a package requires the file package.json to exist. This file describes the package. It is expected to be json-formatted. The total file size must not exceed 2000 byte.
| .name | Required. The full name of the package. Must be a string and must be at max 32 characters long |
| .author | Required. The author of the package. Must be a string and must be at max 64 characters long. It is recommended to use the email Syntax (Foo bar <foobar@example.net>) |
| .desc | Required. A short description of the package. Must be a string and must be at max 140 characters long. |
| .repository | Optional string. A url where the user can get the source code for your package. Must be a http or https location. |
| .version | Optional string. The version of this package. Will be used for update notifications. Max length is 16 characters. See below. |
| .runtime | Optional object value. See below for all available runtime options. |
| .lifecycle | Optional string. Indicates the packages intended use and maturity. See below. |
| .hide_source | Optional bool. Hides the source/version information on the package page. Note that this won't help against someone looking into the synced files on the devices. |
| .nesting | Optional nesting specification. See below. |
| .platforms | Optional list value. Specifies the platforms supported by this package. Have a look at the full list of platform tags for supported values. If unspecified, ["pi/epoch-1"] is used. For packages compatible with the Pi4, you'll have to explicitly add "pi-4" or "pi/epoch-2" to that list. |
| .offline | Optional object. Specifies the offline support status of the package. If provided, must be an object containing the following two values. |
| .offline.support | String. Must be "yes", "no" or "maybe". "yes" indicates to the package user that this package works in a complete offline environment, while "no" means it will not work properly. "maybe" can be used for packages with offline requirements in some configurations. The following info field can then be used to give more information. |
| .offline.info | String. Describes the reason of the offline support value. |
Example package.json file:
{
    "name": "Hello world",
    "author": "Florian Wesch <fw@dividuum.de>",
    "desc": "A hello world",
    "repository": "https://github.com/info-beamer",
    "platforms": ["pi/epoch-1", "pi/epoch-2"],
    "nesting": {
      "parents": ["top-level"]
    },
    "offline": {
      "support": "no",
      "info": "This packages needs to reach the online hello world service to work"
    }
}
package.png
The top-level directory of a package requires the file package.png to exist. The file must use the PNG format and must be 64x64 pixel. The image is used in various places within the info-beamer configuration interface. The image may be transparent.
The total filesize must not exceed 8kb (8192 byte).
Example package.png file:

config.json
You usually should not include a config.json file in any directory of your package. info-beamer hosted will automatically create files called config.json with settings made by the package user as specified in the options value defined in node.json.
When you include a config.json in your package
If you have configuration values that are not user changable but should be kept outside the Lua code, you can use filenames like package-config.json, settings.json or any other filename not used by info-beamer hosted.
If you provide a config.json file it will be ignored and replaced by a config.json file generated by info-beamer hosted.
The values inside the generated config.json file usually map directly to the options specified in the node.json file. Here's a small example: If your options list in node.json looks like this:
[{
    "title": "Header",
    "name": "header",
    "type": "string",
    "default": "A header value"
}]
the generated config.json will look like this (ommitting the also generated metadata for a moment):
{
  "header": "A header value"
}
Of course if the users modifies the value of header through the generated configuration UI, the resulting generated config.json file is updated as well and will be pushed to all devices. Usually the mapping between option value and generated value inside the config.json file is pretty obvious. Some option types generate a bit more, see their documentation for details.
config.json Metadata
All generated config.json files also include a __metadata value that is automatically generated by info-beamer hosted. Right now it includes the following values:
| .device_id | The numeric id of the device the config.json was generated for. Learn more about devices. If your devices send data to other systems and that data should be mapped back to a configured info-beamer hosted device you can use this id as connection. |
| .setup_id | The numeric id of the setup that this config.json file was generated for. Learn more about setups. |
| .instance_id | The numeric id of the package for the node the config.json was generated for. Learn more about nesting packages in a setup. |
| .package_id | The numeric id of the package for the node this config.json was generated for. Learn more about packages. |
| .scratch | The assigned scratch directory for an eventual package service. |
| .device_data | An user provided object value assigned by setting a device_data value using the 'Update device' API. |
| .node_idx | A numeric id unique to each node within the currently assigned content. If you have multiple package services, each will see a different value within its config.json file. You can use this value to (for example) assign a unique TCP/UDP port by adding this value to a fixed base value. |
| .config_rev | A numeric value counting the number of times the configuration for the current setup's (see setup_id above) configuration was changed. |
| .config_hash | A unique value calculated over the complete generated configuration. If anything within the configuration changes (This metadata block excluded), this value will update. The value is the same across different devices if they get assigned the same setup. |
| .api | An object describing an entry point for on-device APIs. Documentation will follow. |
| .secrets.setup | A 32 digit hex string value representing a secret shared between all devices that have the same setup installed. This value can be used to establish secure peer-to-peer communication between such devices using a package service. This value might update from time to time. If that happens it happens at about the same time on all devices that share the same setup. |
| .secrets.account | A 32 digit hex string value representing a secret shared between all devices in your account. This value can be used to establish secure peer-to-peer communication between your devices using a package service. This value might update from time to time. If that happens it happens at about the same time on all devices in your account. |
| .sync_ts | A number representing a timestamp. This timestamp is identical across a single setup assigned to multiple devices. The timestamp represents the last change made to the setup configuration, but is not precise for internal reasons. Instead it provides a timestamp between 0 and 30 seconds after the last change made to the setup. This can help if you want to make configuration changes appear more atomic across devices without having them communicate with each other: You can query this timestamp, add (for example) 120 seconds and end up with a timestamp that's around two minutes after a setup has been updated on the info-beamer system. Within these two minutes your devices hopefully download the updated content and inside your Lua code you can wait until those two minutes have passed before changes made to config.json are actually used by your code. |
| .timezone | A string containing the assigned timezone. You can change the timezone using the 'Update device' API. |
Expanded schedules
By default schedules within configurations are provided verbatim within the generated config.json. If you set expand_schedules to true in your node.json info-beamer hosted can instead create a new top-level object __schedules in the generated config.json file based on each schedule and the configured timezone of the device. This makes it easier to handle schedule decisions from within Lua. Here's an example of how that might look like:
"__schedules": {
    "expanded": [
           [[1728597600, 86400], [1728856800, 86400]]
    ],
    "range": [1728597600, 1209600],
}
The expanded value is an array of arrays, each containing sorted tuples. Each tuple is a start time (as a unix timestamp) as well as a duration in seconds. Ranges given by these tuples don't overlap or touch.
Within the node.json, schedules are now either given as "always", "never" or a numerical value. This value is an index into the expanded list within __schedules (requiring +1 due to Lua's 1-based indexing), each then containing a list of tuples describing when the schedule is active.
The following Lua code can be used to probe if a given schedule (given as a numerical index) is active. The code assumes the config.json is loaded into the global variable config.
local function is_schedule_active(schedule)
    if schedule == "always" then
        return true
    elseif schedule == "never" then
        return false
    end
    local now = os.time()
    if now < 10000000 then
        return false -- no valid system time, don't schedule
    end
    for n, range in ipairs(config.__schedules.expanded[schedule+1]) do
        local starts, duration = unpack(range)
        if starts > now then
            break
        elseif now < starts + duration then
            return true
        end
    end
    return false
end
node.json
Each directory inside a package may contain a node.json file. This will then provide the user of your package with a configuration interface to control the runtime behaviour of this directory. The top-level directory must provide a node.json. Each file is using the JSON file format and must not exceed 32kb (32768 byte) size.
| .name | Required. The name of this node inside your package. Must be a string and not exceed 32 bytes. |
| .permissions{} | Optional object describing which permission this node requires. See below for more information. By default no special permissions are granted. |
| .custom_ui | Optional string value. Allows you to completely customize the configuration interface. See below. |
| .control_ui | Optional string value. Allows you to include a control interface that is shown on the device page for setups that use this package. This allows you to remotely send commands to the nodes. Have a look at this blog post for more information about this feature. |
| .options[] | Optional. A list of options with configuration options for this node. See the options description for more information. |
| .optional[] | Optional list value. You can specify package files that won't end up on a device unless they are referenced as an asset. See the 'optional' description for more information. |
| .deferred[] | Optional list value. Can be used to mark certain files deferrable. See the deferred description for more information. |
| .presets[] | Optional list of preset configuration examples that can by applied to this node. See node presets for more information. |
| .scratch_mount | Optional alphanumeric string. Specifies a target filename where the package service SCRATCH directory is mounted as a symlink. This allows you to access your scratch directory content directly from info-beamer if you use the node.make_nested feature. |
| .scratch_scope | Optional string. Must be either "instance" (the default value) or "package". The value decides how a package service's scratch directory is scoped. Check the linked documentation for more on that. |
| .content_process{} | Optional object. Specifies how content processes are executed by info-beamer. The key is the executable name. The value is another object, with currently only supporting a single settings: "skip_overlays": true to not running the content process in the normal node overlay. |
| .expand_schedules | Optional boolean, defaults to false. If set to true, all schedules within this node will be expanded into a new top-level object __schedules within the generated config.json of each device. This can make it a lot easier to work with schedules. See the expanded schedules description. |
Example node.json file:
{
    "name": "Hello World Node",
    "permissions": {
        "network": "Must fetch something from remote"
    },
    "options": [{
        "title": "Text",
        "doc_link": true,
        "hint": "What to display",
        "name": "text",
        "type": "string",
        "default": "Hello world"
    }]
}
Custom configuration interface
If you use the custom_ui option, you must provide the name of an HTML file in your package. This works similar to custom options. But you can provide an interface for all options instead of just providing the interface for a single one. You also have to include the automatically provided file hosted.js in your HTML file like this:
<script src='hosted.js'></script>
Once included you have to wait for initialization. Once initialized you have access to the current configuration as a json object. Additionally you get access all user assets so you can provide a custom interface to select those, if you want to:
<script>
  ib.ready.then(function() {
    // All initialized! ready to show your interface
    console.log("current node config", ib.config);
    console.log("all user assets", ib.assets);
    console.log("all node assets", ib.node_assets);
  })
</script>
Fire up any single page app and use that to provide your user interface. Every time a user makes a change to an option you should sync back the current configuration to info-beamer hosted so it can get saved once the user clicks on the
ib.setConfig(the_current_config);
The config you set must match the structure laid out in node.json.
info-beamer hosted provides a mockup hosted.js you can use during development to speed up the feedback cycle. Download hosted.js from the package SDK and include it in your package. It will create a mockup that reflects the real hosted.js but makes it easy to run your HTML configuration outside the hosted environment. You'll have to provide dummy values for the configuration and list of assets before you include hosted.js like this:
<script>
  MOCK_ASSETS = {
    1: {
      id: 1,
      thumb: "dummy.png",
      filetype: 'image',
      filename: 'dummy.png',
      uploaded: 1234567890,
    }
  }
  MOCK_NODE_ASSETS = {
    "package.png": {
      id: "package.png",
      thumb: 'package.png',
      filetype: 'image',
      filename: 'package.png',
    }
  }
  MOCK_CONFIG = {
    timezone: "Europe/Berlin"
  }
</script>
<script src="hosted.js"></script>
node.png
Each node inside your package can an optional 64x64 icon image in the PNG format. The image is used in various places within the info-beamer configuration interface. The image may be transparent.
The total filesize must not exceed 8kb (8192 byte).
If no image is provided, the default image will be used:

node.lua
This file contains the usual info-beamer Lua code that controls the visualization. You can learn more about how to create code in the info-beamer Lua documentation.
service
This file is optional. Any executable script or binary that the info-beamer hosted os will automatically start. See package services.
overlay.squashfs
This file is optional. A squashfs filesystem that will be mounted on-top of the info-beamer filesystem. Its contents will be available within your package service. See the package services documentation for more infos.
README.md
This file is optional. A markdown formatted documentation about the package. This file will be linked from the package detail page (click the Documentation tab).
You can link to your readme from inside a node configuration file. Append the name of a configuration option in brackets to the end or a heading line. Then set the doc_link value to true. In the example on the right side you can seen the Text headline. It is the help link target for the text option specified in the node.json file.
If you're using the update notifications feature you should have sections that correspond to the versions of your package.
You can also add a Install button your your README.md file. That way users can directly install the package into their account. Directly from (for example) the package's github page.
Example README.md file:
[](https://info-beamer.com/use) # About hello world This is a hello world example package.  # Configuration options Here is how *Hello world* can be configured: ## Text (text) The text to show on screen. By default "Hello world" is used.
README.creole
This feature is mostly obsolete and you should use the markdown format instead. See README.md above.
This file is optional and is an alternative to the README.md file. See the documentation about README.md about how this file integrates with the rest of the info-beamer hosted site.
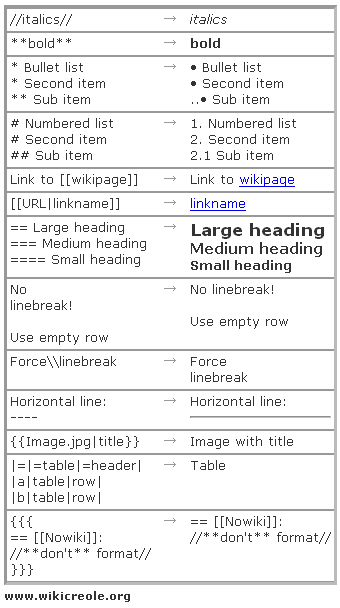
For more information about the markup see the creole wiki or this cheat sheet.
You can use images inside your documentation. Image files inside the top-level directory of your package can be linked using the {{image}} syntax.
If both README.creole and README.md exists, the markdown version will be used.
Example README.creole file:
= About hello world

This is a hello world example package.

{{package.png}}

= Configuration options

Here is how //Hello world// can be configured:

== Text (text)

The text to show on screen. By default "Hello world"
is used.
COPYRIGHT
This file is optional. A pure plain text file that can contain copyright information about your package. Its content will be shown on the package detail page in the Copyright tab.
package-header.jpg
This file is optional. In a public package this JPG image is used as a teaser background image in the top part of the page. It is also use on the store page. See this page as an example. The recommended size is 1280x400 pixels.
screenshot.jpg
You can add optional screenshots to the public page of a package. If this optional file or files like screenshot-1.jpg, screenshot-2.jpg, screenshot-3.jpg , screenshot-4.jpg or screenshot-5.jpg are added to a package, the public page will include a carousel of those images. The recommended size for those images is 1140x640 pixels.
Package configuration
Runtime options
If a package is used as the only package or it's the top-level package in use, it can control certain aspects about info-beamer itself. All of those options can be set using the runtime setting in the package.json file. These settings have no effect if a package is used as a child of another package. The following options exists:
| antialias | Optional boolean, defaults to false. If set, info-beamer will enable multisampling while rendering. This is slightly slower but will produce a higher quality output that's noticable when you (for example) rotate images. Enabling this option corresponds to setting the INFOBEAMER_EXPERIMENTAL_AA setting for info-beamer pi |
| outside_sources | Optional boolean, defaults to false. If set, you are allowed to load resources outside of the current node directory. It also allows loading videos from remote sources to enable streaming. Using this feature is experimental and might cause problems. Use at your own risk. This settings corresponds to the INFOBEAMER_OUTSIDE_SOURCES setting for info-beamer pi |
| transparent | Optional boolean, defaults to false. If set, info-beamer will run in a transparent mode: The framebuffer layer will be visible behind the info-beamer layer. |
| always_on | Optional boolean, defaults to false. If set, info-beamer will continue to run even if the screen is powered off by the device. Usually the info-beamer process is shut down while the screen is off. |
Example runtime value in package.json:
"runtime": {
    "antialias": true
}
Package life cycle
You can specify an informal lifecycle value inside package.json. Possible values are:
| "alpha" | An early release of a package were lots of breaking changes can be expected. |
| "beta" | A package that is almost done but might occationally cause problems. Configurations make in a setup can be expected to be forward compatible |
| "production" | The default value. The package can be used in production and is considered stable. |
| "obsoleted" | The package works but there is a better alternative available. |
The life cycle is displayed on the package detail page and for all values except "production" there will be a link to the documentation. Use the following section names inside the documentation as jump targets:
| "alpha" | ## Alpha release |
| "beta" | ## Beta release |
| "obsoleted" | ## Transitioning to other packages |
Platforms
Some packages might require features or depend on hardware properties that are not available on all Raspberry Pi models. A package can specify which platforms it is compatible with. Right now the following tags exist:
| pi-zero/pi-0 | Pi Zero and Pi Zero W |
| pi-zero-2 | Pi Zero 2 |
| pi-1 | The original Pi 1, Pi 1A+, Pi 1B+ |
| pi-2 | The Pi 2 |
| pi-3 | Pi 3B, Pi 3B+ and Pi 3A+ |
| pi-4 | Pi 4B |
| pi-5 | Pi 5B |
| pi-cm1 | The original Compute Module |
| pi-cm3 | Compute Module 3 and 3+ |
| pi-cm4 | Compute Module 4 |
| pi/v6 | All in pi-zero, pi-1 and pi-cm1. Common characteristic is low memory (512MB max) and single core ARMv6Z CPU. |
| pi/v7 | All in pi-2, pi-3, pi-zero-2 and pi-cm3. Common characteristic is 1GB (with the exception of the Zero) of memory and quad core Cortex-A53 CPU. |
| pi/v8 | Thepi-4, pi-cm4 and pi-5. At least 1GB of memory and quad core Cortex-A72 CPU. Also uses a new OpenGLES environment and media playback system. |
| pi/epoch-1 | Everything before the Pi 4. So pi/v6 and pi/v7. |
| pi/epoch-2 | Everything including and after Pi 4 with a compatible software environment. |
Setups will inherit the combined platform requirements of all used packages. Installing a setup on an incompatible device will prompt for user confirmation when using the dashboard UI.
Nesting
info-beamer allows users to nest packages. That means, users are usually allowed to add additional packages as child packages within any of their setups.
Some packages support adding certain child packages (like plugins) and others can always be added (like for example the power saver package). But most combinations will not work as either the parent package or the child packages are not meant to work together. To prevent confusion, each package can specify the expected parent and child packages it supports. This is specified in the package.json file within the nesting key.
If not provided, the package can be added as child to any other package also missing a specification. This is not recommended and you should add an explicit specification for the supported nesting configurations.
There are two keys within the nesting key:
| .childs | Optional value (see below) specifying which child packages can be added as child to this package. |
| .parents | Optional value (see below) specifying the parent package this package can be added to. |
Each childs/parents value can have these values:
| "any" | Any allows any child/parent package. This should be only used if your package doesn't not interact at all with its parent/child. The power saver package is an example: It works regardless of how the parent package works and thus uses "any" as its parent value. |
| List of strings | The third option is to provide a list of strings. These can have arbitrary values and the user interface marks packages as compatible if both parent and child provide overlapping values. The special value "top-level" within the parents list can be used to indicate that this package can be added as a top-level package in a setup. An empty list indicates that this package doesn't support child or parent packages. |
Examples
A package with a plugin system should use the following nesting value in its package.json file:
{
  ...
  "nesting": {
    "parents": ["top-level"],
    "childs": ["my-package-plugins"]
  }
}
An additional plugin package might then look like this:
{
  ...
  "nesting": {
    "parents": ["my-package-plugins"],
    "childs": []
  }
}
The value "my-package-plugins" can be any value as long as its both used in your base and plugin package.
A normal package that doesn't support any child packages might look like this:
{
  ...
  "nesting": {
    "parents": ["top-level"],
    "childs": []
  }
}
A generic package that can always be added to any setup, like the existing power saver package or any other package that only adds any kind of background service to a setup might look like this:
{
  ...
  "nesting": {
    "parents": "any"
    "childs": []
  }
}
Features
Assets, package configuration options and devices can have a list of features assigned to them. For example an older Pi3 supports the following features: image2k, h264. So it cannot decode hevc videos for example. The features value allows you to express compatibility between configurable assets and device hardware.
Right now the following features are defined:
| image2k | Decode and render images with a size up to 2048x2048 pixels. |
| image4k | Decode and render images up to 4096x4096 pixels. Older OS version (before 11) cannot decode such images. Later version will either downscale on the device while loading or natively load the image. This is possible on the Pi4 as it has an increased maximum texture size. |
| h264 | Decode and display H264 encoded video files. This is supported on all Pi hardware types. |
| hevc | Decode and display HEVC encoded videos with a resolution of up to 3840x2160. Right now this is only supported on the Pi4. |
features are automatically detected for each of your devices. In the API, the device calls return the detected values in .hw.features value. This detected value limits what each device can do in theory.
Your Lua player code in node.lua might not be able to handle every possible feature. For example your code might not be able to use hevc videos, due to the limitation that they only be decoded in raw mode and they cannot be used as GL textures. You can use the feature value in the resource option to prevent such a video from being assigned.
Each asset specifies the features required for its playback. You can see these values in the asset API calls in the .features value. info-beamer hosted automatically prevents you from assigning assets to a resource option if the assets required features are not specified as supported by the resource option.
When you assign a setup to a device using the setup_id in the device update API call, info-beamer will check if the used assets in that setup can be played on the assigned device's hardware. This prevents you from assigning an asset that uses a HEVC video to a Pi3 device which cannot decode such videos.
Update notifications
When a user imports a package into their account, the version imported won't be automatically updated if changes are made to the package source. This approach was chosen so the user can be sure that the imported version will continue to work even if (potentially breaking) changes are made to the source package.
Of couse it might make sense to notify the package user that there is a new version available. To make this possible, just specify a version string inside the package.json file. It can be any alphanumeric value of a length of up to 16 characters. So 1.2 as well as Lazy Tiger are valid versions.
info-beamer hosted will check the package source daily and compare each users version of a package with the version of the package source. If those strings differ info-beamer will mark the package as updateable and the info-beamer hosted website will provide visual hints that the package can be updated. It's then up to the user to decide whether to update or not.
You should also provide information on what your update changes using the documentation in README.creole or README.md. If a package is updateable the package detail page will contain a link that points to the documentation. You can create a new section that will be highlighted when the user clicks this link. Just name your section "Version <versionstring>". If you created a new version called 1.2 the documentation might look like this:
== Changelog
=== Version 1.2

This section describes changes in the new version 1.2.
Node configuration
Node Permissions
Each node inside your package can have optional permissions. By default no permissions are granted. Required permissions are specified by adding its key and a description to the permissions object inside the node.json file.
Just changing the permission value will have no effect to an already running service on a device. You have to update the service file itself to force a service restart. Otherwise new permissions in the node.json file will have no effect. Of course a device reboot will work as well.
The following permissions are available:
| network | Optional string value. The package service has permission to access foreign network addresses. By default the service can only contact locally running services. |
| run-as-root | Optional string value. The package service will be started as the root user. You should never use this feature except in very rare circumstances as such a service script might damage the device. |
| unboxed | Optional string value. The package service will be started without the default sandbox wrapper. The service still runs as a limited user but might have read access to more files on the device. |
| high-prio | Optional string value. The package service will be started with as a high priority task (as set with nice). Usually package services run at a high niceness of 19. Setting this permission runs them at -5 instead. |
| input | Optional string value. The package service has access to /dev/input/*, so input devices like keyboards, mice or connected touch screens. Not enforced until info-beamer OS release 11 |
| gpio | Optional string value. The package service can access to /sys/group/gpio. This allows it to access hardware connected to the GPIO ports of the Pi. |
| vchiq | Optional string value. The package service can access /dev/vchiq. This allows access to features like the camera module. Not enforced until info-beamer OS release 11 |
| serial | Optional string value. The package service can access to /dev/ttyS0. This allows it to do serial communication with connected hardware. |
| internal-api | Optional string value. The package service can access priviledged operations of the internal device API. |
It is recommended to uses the string value of each requested permission to describe why a package requires a certain permission to make it transparent for the user why the permission is needed. The permissions of a nodes in a package can be seen on the package page in the Nodes in this Package section. The permissions are also displayed a user imports a package through the Single click install button.
The permission descriptions must not exceed 140 characters.
Example permissions value in node.json:
"permissions": {
    "network": "Needs to access twitter API"
}
Optional Downloads
You might want to include examples assets or other files in your package that are not always required on the device itself. This might include the README.md file which is most likely not used on the device.
You can also add example images/videos to your package that are only transferred to the device if they are referenced as an asset in a setup. This enables you to minimize the amount of data transferred to a device.
You can specify as many 'optional' downloads as you need. Each element in the optional list is a string containing a regular expression that is matched against all package files. Matched files won't end up on the devices unless they are referenced in a setup.
Example optional value in node.json:
"optional": [
    "README.md",
    "screenshot.*jpg"
]
Deferrable Downloads
The synchronization process running on your devices will download all package files by default before switching to your visualization. A package might contain bigger asset files that are not required right at the start. The deferred list in node.json allows you to specify regular expression patterns. Downloading of package or asset files for your setup will be deferred (so downloading will start
Some files cannot be deferred: service, node.lua, package.json, node.json and config.json.
Example deferred value in node.json:
"deferred": [
    "video.*mp4",
]
Node presets
Each node can provide example configuration values that makes it easier for a user to get their setup working. The section in the node.json file looks like this:
"presets": {
    "example": {
        "desc": "An example configuration showing a video",
        "config": {
            "playlist": [{
                "asset": "video.mp4"
            }]
        }
    }
}
Within the "presets" option file you can specify any number of presets. The "example" string is the name of the preset. It's intended to be used internally and the value must be alphanumeric only. The value of each preset must have an object with the following fields:
| .desc | Required string. The description of this preset. Intended to be shown to a user. |
| .config | Required object. A config object describing the configuration for this preset. The value is exactly the same as used within the values set in the "config" parameter of the Update setup call and must match the schema described in the options value in node.json. |
The defined presets can be used as the preset value while creating a setup to create a new setup with a predefined example configuration.
Options
All options defined here are used to generate a configuration interface (unless you built your own). The settings made by the users or an api client are validated to make sure only correct values can be configured in a setup based on this package. A config.json files is then generated based on the settings made and pushed to all devices that use a setup based on this package.
Inside the options list in the node.json file you can specify a range of different options that make a node configurable. Each option is a JSON object. All of them share some common values:
| .type | Required string. The type of this option. All available types are described below. |
| .title | Required string. The display title of this option as it is shown on the configuration screen for this node. Must not exceed 64 byte. Although you should probably keep it shorter so it fits on the configuration screen. |
| .name | Recommended string. The internal name for this option. This value will be used to access the user-set value of this option inside your node.lua file and inside your package service. Must be an alphanumeric string. Max size is 64 byte. If you don't specify a name, an autogenerated name will be used instead. This is most likely not what you want and is only useful for Section Options. |
| .hint | Optional string, defaults to the empty string. If specified and non-empty, shows a small ? help icon that can be hovered by the user. If hovered it will show this string. Use it to show a hints on how to use this configuration option. |
| .doc_link | Optional boolean, default false. Whether or not to link to the Node documentaton. If set to true the small ? help icon will link to the package documentation. |
| .ui_width | Optional integer, default 12. Each configuration option can use up the specified space in the configuration interface. Each row of the interface has 12 logical columns. Using ui_width you can control how many columns a particular option should use. The value is expected to be an integer value between 0 and 12. Use 0 to hide a configuration value. |
| .ui_spacing | Optional integer, default 0. Controls the number of columns to leave free on the right side of the option. If you fill up a complete row by adding enough spacing you can force the next option to flow into the next row of the interface. |
A full example option:
{
    "title": "Time Zone",
    "ui_width": 4,
    "ui_spacing": 4,
    "name": "timezone",
    "type": "select",
    "hint": "The timezone",
    "options": [
        ["UTC", "UTC"],
        ["Europe/Berlin", "Europa / Berlin"]
    ],
    "default": "UTC"
}
Option 'boolean'
A boolean value. The configuration interface will display a checkbox that allows easy selecting and deselecting.
| .default | The default value. Must be a boolean value. If unspecified defaults to false. |
| .info | Optional string value shown next to the checkbox. |
Option 'color'
Shows a color chooser in the configuration interface.
| .default | A color value (specified as a list with four elements: red, green, blue, alpha). Defaults to opaque black [0, 0, 0, 1]. Each components must be in the 0 - 1 range. An alpha value of 0 is fully transparent while 1 is opaque. |
Example option using color:
{
    "type": "color",
    "title": "Background color",
    "name": "background_color",
    "ui_width": 4,
    "default": [1,1,1,1]
}
The generated value in config.json looks like this:
"background_color": {
    "rgba": [1,1,1,1],
    "r": 1,
    "g": 1,
    "b": 1,
    "a": 1,
    "hex": "FFFFFF"
}
Option 'custom'
Allows you to provide a completely custom interface for your configuration option. Just provide the page value with a name of an HTML file included in your package. info-beamer hosted will load this HTML file inside an iframe and set up a two way communication channel you can use to submit the value your interface wants to save.
Inside your iframe you should include the automatically provided file hosted.js like this:
<script src='hosted.js'></script>
Once included you can wait for initialization like this:
<script>
  ib.ready.then(function() {
    console.log("current option value", ib.config);
    // start your user interface
  })
</script>
You can use any single page web framework you want to display any interface. Once a user makes a change to an option, you should submit that change to the info-beamer hosted website like this:
ib.setConfig("new option value");You can set any value that can be parsed as JSON. It will end up gettings saved in the users setup and will be distributed to all devices just like any other configuration value.
Example option using custom option type:
{
    "name": "test",
    "type": "custom",
    "page": "test.html",
    "default": {
        "one": 1,
        "two": "2"
    }
}
Option 'date'
Shows a date input field. Most modern browsers should display an interface for choosing a date. Otherwise it falls back to a normal text box. By default empty dates are not supported, but can be allowed.
| .default | The default value. Must be a string with YYYY-MM-DD format. utc-now is also supported as a special value that will evaluate to the current date in the configuration UI. |
| .allow_empty | Optional boolean value that allows empty values for the date value. |
The generated value in config.json looks like this:
"date": {
    "year": 2018,
    "month": 12,
    "day": 31,
    "value": "2018-12-31"
}
Option 'device'
Shows a drop down menu of all your devices. You can select one of them. The device serial as a string value will end up in the generated config.json. In your Lua code you can compare that value to the current device serial number you can access by calling sys.get_env('SERIAL').
Example option using device:
{
    "type": "device",
    "title": "Device",
    "name": "serial"
}
Option 'device_token'
Shows a drop down menu of available on-device accesses. You can select one of them. This will expose the corresponding on-device token as a string value in the generated config.json.
Example option using device_token:
{
    "type": "device_token",
    "title": "Access to your account",
    "name": "device_token"
}
Option 'duration'
A duration value in seconds specified as a float value. The configuration interface will show a textbox to modify this value.
| .default | The default value. Must be a numeric value. If unspecified defaults to 1 (second). |
| .placeholder | A placeholder shown if the input dialog value is empty. Can be used to describe the expected value to the user. |
Option 'float'
An float value. The configuration interface will display a textbox with optional controls to increment/decrement the set value.
| .default | The default value. Must be a numeric float value. If unspecified defaults to 0. |
| .placeholder | A placeholder shown if the input dialog value is empty. Can be used to describe the expected value to the user. |
Option 'font'
Allows the selection of a font.
| .default | Required string. The name of a font file to use. The default value must provide a valid name for a font file. It is therefore highly recommened to add a font file to your package and use its name here. That way a user that didn't upload any additional fonts can still use your package. |
Example font option:
{
    "title": "Headline font",
    "ui_width": 4,
    "name": "headline_font",
    "type": "font",
    "default": "silkscreen.ttf"
}| .default | The default value. Must be a float value. If unspecified defaults to 0. |
Option 'integer'
An integer value. The configuration interface will display a textbox with optional controls to increment/decrement the set value.
| .default | The default value. Must be a numeric integer value. If unspecified defaults to 0. |
| .placeholder | A placeholder shown if the input dialog value is empty. Can be used to describe the expected value to the user. |
Option 'json'
A verbatim JSON value. The configuration interface will show a readonly text box. Changing these values through the editor isn't supported at the moment.
You can set an define arbitrary value for a JSON option through the use of the Update Setup API. Note that if you use mode=update to merge a newly value with an existing configuration value, the merging algorithm traverses into your JSON value. Lists ([]) will be updated: the old list value will be truncated to the length of the newly set value and the merging will be applied to each item in the list. For objects ({}), all existing keys will be kept and existing keys will be recursively merged.
This means that you should not have objects ({}) with variable and changing keys if you intend to use mode=update in your setup configuration API call. Otherwise the JSON value will grow each time you add a new key.
So instead of something like
{
    "devices": {"serial_num_1": {....}, ..}
}
use a structure like
{
    "devices": [{"serial": "serial_num_1", .....}, ..]
}
That way the variable number of entries is in form of a list which will be truncated if you update it with a new list with fewer elements in it.
| .default | The default value. Can by any value, even nested objects. If unspecified defaults to {}. |
Option 'list'
Show an interface that allows the creation of a list of items. The type of item a list handles is configured per list. Each list can have zero or many items. You cannot specify a default value for a list - it is always the empty list.
| .itemname | The display name of each item. It is used in the configuration interface to show the user certain actions. If you name your items Image for example the user interface would provide an "Add Image" button. |
| .items[] | A list of options. This list controls what options a single item provides. Each option is exactly the same kind of option the top-level options list uses. You can even nest lists. |
| .adders[] | An optional list of prefilled items. By default the UI will add a button like "Add <itemname>" to each list. Clicking this button will append a default item with all its values set to their respective default value. Using adders you can overwrite defaults when adding a new item to a list. See below. |
An example list you might use to model a playlist:
{
    "title": "Playlist",
    "name": "playlist",
    "type": "list",
    "itemname": "Playlist item",
    "adders": [{
        "label": "Default asset",
        "item": {}
    }, {
        "label": "Long duration asset",
        "item": {
            "duration": 600
        }
    }],
    "items": [{
        "title": "Resource",
        "ui_width": 6,
        "name": "file",
        "type": "resource",
        "valid": ["image", "video", "child"],
        "default": "empty.png"
    }, {
        "title": "Duration",
        "ui_width": 3,
        "name": "duration",
        "type": "duration",
        "default": 5
    }]
}
The generated value in config.json is a direct 1:1 mapping into a list containing the defined items as defined in item.
The adders list will customize the UI by presenting two buttons for adding items to this list. The first one will use default values, while the second one will add an item with the duration value overwritten to 600 instead of using the specified default of 5 seconds.
Option 'resource'
Shows an interface that allows selecting assets (images, videos) or child nodes. Both package local child nodes and child nodes from nested packages are available. Assets can be selected from uploaded assets or from assets included in the package itself.
| .default | Required string. The name of the default resource used. Since a valid resource has to be specified you should add this default resource to your package. So for example if you want to allow the user to select an image be sure to add a default image to your package and specify its name as the default value. |
| .valid | Optional list of strings. Specifies which type of resource the user can select. Value options are image, video, font, json and child. |
| .features | Optional list of strings. This list specifies which features the corresponding Lua player code can handle. Any specified feature is added to the default feature set corresponding to the resources specified in valid: For image, the feature image2k is always added. For video, the feature h264 is added. |
The different resource types can be used to compose packages in interesting ways. If you for example allow the selection of child resources, the user can create a setup based on your package, add another package as a child and then for example display this child as the background for your package.
Example option using resource that allows selection of images. For this example the file empty.png should be added to your package:
{
    "title": "Background image",
    "ui_width": 4,
    "name": "background_image",
    "type": "resource",
    "valid": ["image"],
    "default": "empty.png"
}
In the above example, no features value is specified. As this resource only allows resources of type image, the default feature image2k is used. The user can therefore assign assets with a resolution of up to 2048x2048. If you also want to allow 4K images, add "features": ["image4k"] to the option.
Resources are special as they generate bunch of values in the config.json file. A generated value for the above resource option might looks like this:
"background_image": {
    "asset_id": 13962,
    "asset_name": "asset-5d41402abc4b2a76b9719d911017c592-image.jpg",
    "filename": "image.jpg",
    "metadata": {
        "format": "jpeg",
        "height": 1920,
        "width": 1080
    },
    "type": "image"
}
The individual values are as follows:
| .asset_id | The asset it of the selected asset use in this resource. It can either be a numeric value if it's one of your uploaded assets or a string value if its a file included in the package itself. |
| .asset_name | The local filename of this asset as available in the current node directory on the device. Use this filename in your resource loading calls like resource.load_image or resource.load_video |
| .filename | This is the original filename of the asset in your asset collection. |
| .metdata | Optional object containing metadata of the asset resource. Note that all metadata is optional and not available for package local files (those with string asset_ids. |
| .type | String describing the type of the object. If the valid value in your resource option allows different types you can query the type of the chosen resource here. |
Option 'schedule'
A schedule specification. Value is either "always", "never" or a custom schedule specification. Such a specification object looks like this:
{
    "start": "2022-01-01",
    "repeat": {
        "freq": "weekly"
    },
    "spans": [
        [0, 60],
        [120, 1440]
    ]
}| .start | A required string value specifying when the schedule starts. Must be provided in YYYY-MM-DD format. |
| .repeat | A required object specifying how the schedule repeats. The following options are available. |
| .repeat.freq | A string specifying the schedule frequency. Must be either "daily", "weekly" or "monthly". |
| .repeat.until | When specified, the schedule repeats until and including this date. Must be provided in YYYY-MM-DD format and must be after the schedule's start date. Cannot be combined with .repeat.count. |
| .repeat.count | When specified, the schedule repeats for this many occurrences. Must be at least 1. Cannot be combined with .repeat.until. |
| .repeat.interval | When specified, the schedule repeats every n days, weeks, months depending on the provided frequency. Defaults to 1. |
| .spans[] | Specify the minutes the schedule is active within the constraints given by the schedule frequency. For example when using a "daily" frequency the day is is made up of 1440 minutes in total. Each span is a two-element list providing the start and end minute. In the example above, the [0, 60] value marks the schedule as active between 00:00 and 01:00 in the morning, while [120, 1440] means active between 02:00 and 24:00. The end value is always non-inclusive. In the example above, this means that the schedule will be active until 23:59:59. |
Within a generated config.json, the schedule is by default provided as configured. A better alternative is to specify "expanded_schedules": true within node.json. This will instead expand schedules so a decision can be easily made in your Lua or package service code.
Option 'section'
Displays a section header in the configuration interface. The title is use as the section Use it to group options into logical units. No additional options.
| .intro | Optional string value. This text is shown below the title. |
This option does not end up in the generated config.json as there is nothing to configure.
Option 'select'
Show a select box where the user can choose one of the provided options.
| .default | The default value for the select option. Can be any data type. If the default value is not found in the defined options, it defaults to the first option. |
| .options[] | A list with at least a single option of the following format. |
| .options[][0] | The value of this option. Can be any data type. |
| .options[][1] | The displayed name of this option. |
There must be at least one option specified inside options and each option must be an array of size 2.
If your node offers a way to specify a screen rotation, you might use a select option for that. It could look like the example code in the right column.
Hint: The live preview image on the device detail page will automatically rotate according the the configured value of your rotation option if available. You can use the provided util.screen_transform function in your Lua code.
A valid value for options might look like this:
{
    "title": "Display rotation",
    "ui_width": 4,
    "name": "rotation",
    "type": "select",
    "hint": "Rotate content clockwise?",
    "doc_link": true,
    "options": [
        [0, "None"],
        [90, "90°"],
        [180, "180°"],
        [270, "270°"]
    ],
    "default": 0
}
The generate value in the config.json files is just the option value (So options[selected_option][0]) of the selected option.
Option 'string'
A string value. The configuration interface will show a normal input box to enter a value.
| .default | The default value. Must be a string value. If unspecified defaults to the empty string. |
| .placeholder | A placeholder shown if the input dialog value is empty. Can be used to describe the expected value to the user. |
| .ui_type | Optional string value of either text (default) or password that specifies how the string entry UI behaves. Setting password will result in a password field where the entered value isn't directly visible. Note that the value can be easily accessed anyway and there is a button to unhide the password value to make that clear. |
Option 'text'
A string value. The configuration interface will show a textbox to enter a value.
| .default | The default value. Must be a string value. If unspecified defaults to the empty string. |
| .placeholder | A placeholder shown if the text field is empty. Can be used to describe the expected value to the user. |
| .rows | Optional integer value between 1 and 10. If unspecified defaults to 5. Specifies the number of lines to display in the configuration interface. |
