
Reception Screen
Reception Screen
This package allows you to display images, videos and text next to a text scroller. All offered with an easy configuration interface that allows you to schedule your content.
Configuration Screen
Once you install this package, create a new setup by clicking the Create Setup button. You'll end up in the setup configuration page that allows you to configure your reception screen. First you'll can set some general options that apply to all pages displayed. It will look like this:

Make sure you set your correct time zone, so the clock in the bottom left corner shows the correct time and date.
You also have the option to set a header and footer images. The header images should have the resolution 1920x100, so it fits perfectly. The header image is shows for all pages except when you choose to show an images/video in fullscreen mode.
You can also set a footer image. It should be 1920x50. The left 300 pixels are used by the clock. The remaining pixels show the scrolling text.
You can use the included example-footer.png and example-header.png can be used to test.
If you want to play audio for video files, select the audio checkbox.
Adding Pages
Now it is time to add your content. You can add as many pages as you want. Just click on Add to create a new page.
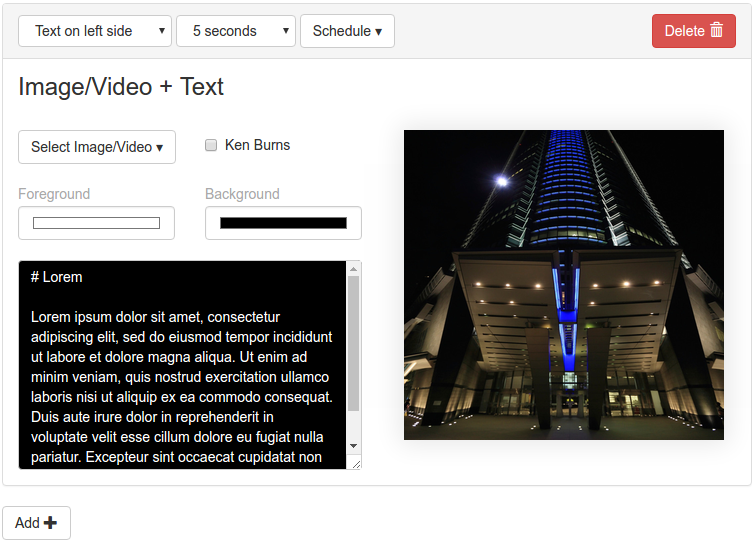
In the top panel you can select multiple layouts:
- Text on left side - Will show an image and a text. The text will be on the left half of the screen.
- Text on right side - Same as above except that the text is on the right side.
- Fullscreen - Show a video/image in fullscreen mode. This will hide the header image. Only the scrolling text and the clock is visible.
Next to the layout dropdown you can see the Duration selector. You can select how long the current page should be visible before switching to the next one.
Finally you can select a custom schedule for your content. By default your content is always scheduled. If you click on the Schedule button, a new grid of options will be visible:
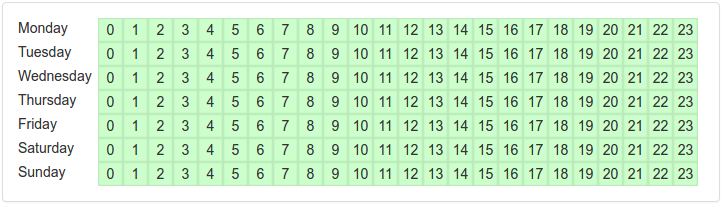
You can click on each individual hour to toggle whether the current page should be visible or not. If you want to change multiple hours at once, just click and hold the left mouse button while moving over multiple hours. You can also toggle complete days if you click on the name of a day.
Fullscreen Pages
If you choose the fullscreen page layout you can select one of your images/videos. It will take up most of the screen except for the static buttom bar with its scrolling text/clock.
Text Right/Left Pages
If you select one of the text page options you can now select an image or video. It should have a resolution of 960x930 to fit perfectly into one half of the screen. For images you'll also have the option of selecting whether or now the image should slowly pan (the ken-burns effect).
You can also select the background and text color for the other half of the screen. Just click on the color selectors and choose your color.
Finally there is the text field that allows you to input the text you want to show on the screen. It supports a limited set of markdown to allow you to easily format your text:
Use # or ## to create a headline like this:
# Headline

## Sub header

Normal text
You can also render tabular data using the | character like this:
Opening times:

Mo-Fr | 9am - 6pm
Sa | 1pm - 6pm
So | Closed
All text is automatically wrapped and centered on the screen.
Scrolling Text
If you want to add scrolling text, select the Scroller node on the left side of the configuration screen. You'll see the configuration interface for the scroller. You can add your own text here by clicking on the Add Text button and then adding your text in the new row.
Changelog
Version 0.6
- Fix potential issue when running on fast devices. Due to an initially missing system time at device start, content scheduling can get confused.
Version 0.5
- Now defaults to using the device's timezone. Use the device list to adjust a device's timezone.
- Layout adjustments for 720p and 4K.
Version 0.4
- Compatible with the Pi4
Version 0.3
- Added the ability to enable audio output for all video files. If you enable this option, be sure that your device actually outputs audio to the correct audio target.
Version 0.2
- Added support for the "automatic duration" setting per page.
Want to run Reception Screen on your Raspberry Pi?
This package is ready to run on your Raspberry Pi using info-beamer.com hosted. Easily manage unlimited number of Raspberry Pi devices and centrally configure and run visualizations like this on them. info-beamer.com is a prepaid service. You only pay for the resources you are using. No long term commitment, no hidden fees. Learn more...
Compatible devices
pi-1 pi-2 pi-3 pi-4 pi-5 pi-cm0 pi-cm1 pi-cm3 pi-cm4 pi-cm5 pi-zero pi-zero-2Compatible packages
This package can be extended by importing the following packages as well. You can then add the following packages as a child package of Reception Screen to get additional features not included in Reception Screen itself.
Power Saver
Offline support
No This package will not work offline: Needs time source to show a correct clockSource code for this package
https://github.com/info-beamer/package-reception shows you the full source code of this package so you can freely modify it if you want.Copyright
Unless otherwise (see below) noted:
Show full license information
Unless otherwise (see below) noted:

    BSD 2-Clause License

    Copyright (c) 2017, Florian Wesch <fw@dividuum.de>
    All rights reserved.

    Redistribution and use in source and binary forms, with or without
    modification, are permitted provided that the following conditions are met:

    * Redistributions of source code must retain the above copyright notice, this
      list of conditions and the following disclaimer.

    * Redistributions in binary form must reproduce the above copyright notice,
      this list of conditions and the following disclaimer in the documentation
      and/or other materials provided with the distribution.

    THIS SOFTWARE IS PROVIDED BY THE COPYRIGHT HOLDERS AND CONTRIBUTORS "AS IS"
    AND ANY EXPRESS OR IMPLIED WARRANTIES, INCLUDING, BUT NOT LIMITED TO, THE
    IMPLIED WARRANTIES OF MERCHANTABILITY AND FITNESS FOR A PARTICULAR PURPOSE ARE
    DISCLAIMED. IN NO EVENT SHALL THE COPYRIGHT HOLDER OR CONTRIBUTORS BE LIABLE
    FOR ANY DIRECT, INDIRECT, INCIDENTAL, SPECIAL, EXEMPLARY, OR CONSEQUENTIAL
    DAMAGES (INCLUDING, BUT NOT LIMITED TO, PROCUREMENT OF SUBSTITUTE GOODS OR
    SERVICES; LOSS OF USE, DATA, OR PROFITS; OR BUSINESS INTERRUPTION) HOWEVER
    CAUSED AND ON ANY THEORY OF LIABILITY, WHETHER IN CONTRACT, STRICT LIABILITY,
    OR TORT (INCLUDING NEGLIGENCE OR OTHERWISE) ARISING IN ANY WAY OUT OF THE USE
    OF THIS SOFTWARE, EVEN IF ADVISED OF THE POSSIBILITY OF SUCH DAMAGE.

package-header.jpg
    CC0 licensed
    https://stocksnap.io/photo/7HRFNYC7GU

default-font.ttf
    Originally called OpenSansEmoji.ttf
    Apache 2.0 licenced
    https://github.com/MorbZ/OpenSansEmoji

default-font-bold.ttf
    Part of OpenSans
    Apache 2.0 licensed
    https://fonts.google.com/specimen/Open+Sans

vue.js/juex.js
    Part of vue.js
    MIT licensed
    Learn more at https://vuejs.org/

hosted.py / hosted.js
    Part of the info-beamer hosted SDK
    BSD2
    https://github.com/info-beamer/package-sdk
