
HD Image/Video Player V2 beta
A media player supporting FullHD videos and images. Each playlist slot can be individually scheduled. There are two playback modes for each slot: Video wall or fullscreen.
For video wall slots, multiple devices can work together and the content can be spread across your displays. The layout for each display is highly configuable allowing you to (for example) build 2x2 or even larger installations.
Fullscreen slot play content on a single display. If multiple devices run the same setup, they will play content synchronized. Additionally you make individual display play alternative content. This can be used to (for example) have a synchronized playback for installations like a food menu where multiple displays show different images.
Fullscreen and video wall slots can be freely mixed. Scheduled videos and images can optionally be overlayed with additional plugins. This can be used to add scrollers or other content. Overlays can be individually scheduled and can use conditions to decide when they are active.
Multiple devices in a local network all running the same setup will automatically form a peer group and synchronize playback of content by selecting one leader device that controls the group. Make sure you have the P2P (peer-to-peer) feature enabled for all devices and configured your network to allow cross device communication.
Alpha release
This is a first release of this package. The package includes a number of new features not previously available on info-beamer hosted. As such it's still considered experimental. You're welcome to use this package but should be aware that things might not always 100% work. Feedback is very welcome.
Usage guide
Creating a content cycle
You create a content cycle similar to other package (like the HD player for example). Each item is individually scheduled. Embedded playlists provide bring their own scheduling with them.
Fullscreen slots
When you open the setup's configuration page, the simplest method of adding content is to click on the "Add fullscreen slot" button to add one or more images or videos to your playlist:

Then select the images/videos from the popup. Your newly added content will be appended to the playlist:

Content added to fullscreen slots will by default play fullscreen on any device you assign the setup to. If you assign the same setup to multiple devices within the same network, all playback will be synchronized. You can optionally transform the output so it is rotated or scaled into a specified area. This can be used if you're using rotated display or video wall processors which required cropped output. See device specific settings below for more information.
Alternative content
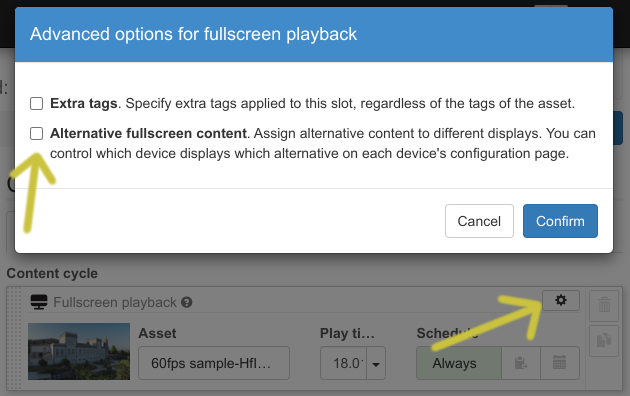
Each fullscreen slot can have additional alternative content. This can be used, for example, when you want to display different images/videos on each display but still synchronize your playback. One use case might be a food menu where each display shows a different part of the menu. In that case you can configure each device to prefer a different alternative and then use alternative content feature within that playlist slot. For that, click the cogwheel icon, then enable "Alternative fullscreen content" in the popup:
The slot will now allow you to add alternative content: Click on the "Add alternative" button and select one or more alternative assets. They will be added to the playlist slot like this:
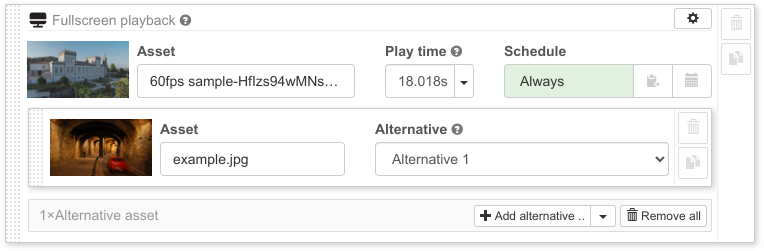
The "Alternative" dropdown menu option allows you to select which alternative slot this assets is assigned to.
You can then specify which alternative slot each device should preferrably play on its device detail page. There are a total of 8 alternative slots available. If you add multiple assets to the same alternative slot the device will loop between all alternatives for that slot each time the slot is active.
Additionally if you have the same number of assets in multiple alternative slots, they will always play in sync. So if you have item1, item2 and item3 as "Alternative 1" and item4, item5 and item6 as "Alternative 2", item1 and item4 will always play together.
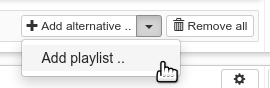
Instead of adding a single asset you can also add one of your playlists and assign all of its items to an alternative slot. Use the dropdown menu and select "Add playlist..", then select the playlist you'd like to add.
Embedding playlists
Within your content cycle you can also embed your playlists created in your account to the content cycle. Click on the "Embed playlist.." button, then select a playlist.
When using embedded playlist and assign the setup to multiple devices, all devices will play the content in sync on all devices. Scheduling information specified in the playlist is used to decide when to play each item.
Video wall slots
Video wall slots are similar to fullscreen slots but during playback content will potentially be spread across multiple displays if assigned to multiple devices. Placement of each individual display is managed not within the setup itself but on each device's detail page. See the "Device specific configuration" for more information on how to configure each device within a video wall type installation.
Slot playback time
You can change the individual play duration for each item. By default it's pre-filled to 10 seconds for images and uses the video's duration for any video content. If you do not want to configure a fixed duration (which might be useful during API based automation) you can also set the duration to 0. This will then use the same auto detection of playback time but doesn't require you to set a fixed value. Minimum playback time of any kind of item is 2 seconds.
Slot scheduling
Each slot added to your content cycle can be individually scheduled. By default each added item is always scheduled. The greenish "Always" indicates that. You can click it to switch between "Always" and "Never".
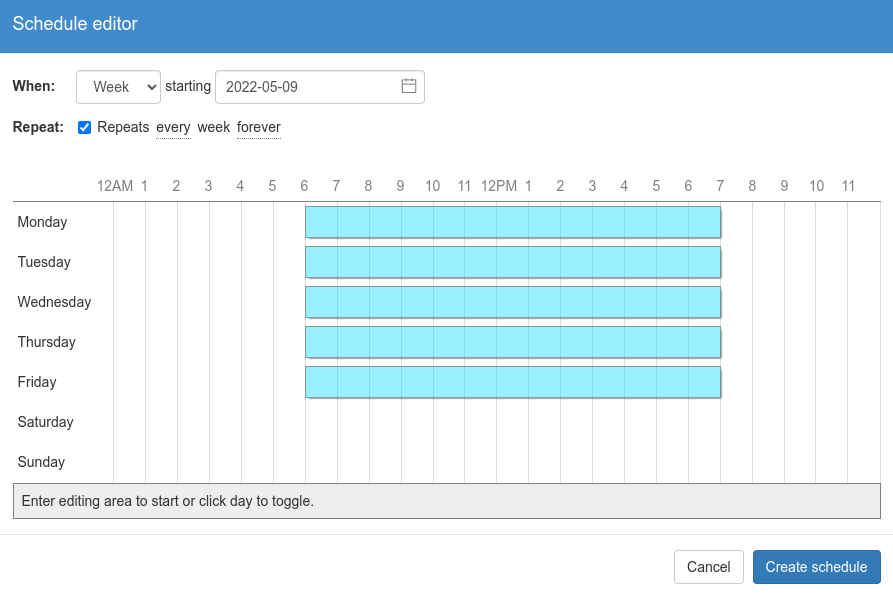
If you want to schedule an item according to a custom schedule, click the small calendar icon within the schedule configuration button. It will open up a schedule editor. You can specify the type of schedule (month, week or day) and set a start and optional end date. Additionally you can specify if and how the schedule should be repeated. Within the editing area you can then click and hold to set multiple active range within the day, week or month.
You can control the device's timezone on the device list page. Select a device, then select "Modify device.." and select "Set timezone..".
When using embedded playlists, the scheduling information from the playlist is used.
Copying schedules
You can use the two clipboard buttons next to customized schedules to copy and paste each schedule. If want multiple playlist slots have the same schedule, copy the schedule, then paste on each slot. Alternatively after you've pasted to one slot you can hold 'SHIFT' and paste on another slot. The editor will copy the schedule to all items between the two slots.
Editing an existing schedule
Use the "Edit.." button to edit a schedule for a playlist item. Note that this will only change the schedule of that individual item. Copied schedules are not affected, so you'll have to copy any change to other playlist slots again if needed.
You can remove a custom schedule by clicking on the "X" symbol. This will remove the custom schedule and revert the playlist slot to "Always".
Playback settings
The package supports various settings to specify how playback behaves. There are general as well as advanced settings.
General settings
You can set fallback content for both horizontal as well as vertical devices. Only images are supported as fallback. They are shown on the display if nothing can be played. There are multiple reasons this might be the case:
No slot is currently scheduled: If you have created custom schedules for your items and none of them is currently active, no slot can play and instead the fallback is active.
The device doesn't have a correct time and your playlist contains only custom scheduled items. In that case the decision on whether or not an items can play cannot be made yet and only the fallback content remains.
If you use multiple devices in synced playback and network connectivity between the leader and a follower device is lost. In that case the following device might not receive the command the play the next content and will fall back to showing the fallback content after a few seconds.
The settings also allow you to specify how devices should behave when only playing fallback content. You might have a content cycle that only has items scheduled to play during the day. In such a case you might set the "When playing only fallback" option to "Turn off displays". The attached displays will turn off after a few seconds once nothing is scheduled any more and will turn back on automatically once items get scheduled again.
Advanced settings
Content scaling
Both fullscreen and video wall slots play content within a configurable canvas. For fullscreen slots that usually the full display size of a device. In case of video walls slots its the locally detected resolution upscaled according to the placement configuration made on each device detail page. In both cases this canvas size might have an aspect ratio that doesn't necessarily match the aspect ratio of the content. For example you might try to play 4:3 (for example a 1024x768 image) on a 16:9 FullHD display. The default is scale the content into the available canvas while preserving the aspect ratio. For the above example this might result in a centered image with free space to the left and right of it.
Virtual resolution
By default the content assumes a 1920x1080 (FullHD) virtual resolution. This means that content is expected to have a 16:9 aspect ratio. Note that this resolution doesn't necessarily need to correspond with the physical resolution or aspect ratio of displays. If you have an anamorphic video wall with non-square pixels, it might happen that you need to generate a HDMI signal with with an aspect ratio different from the detected output resolution.
Note that this also doesn't limit the generate output resolution. So you can still show 4K images on a 4K display without loss of resolution, even if you select 1920x1080 canvas as 16:9 content will be upscaled to the physical resolution without loss of precision.
Audio
Enabling audio will allow audio playback for videos. Be sure to also configure each device to support audio playback using either analog output or HDMI. Use the configuration editor on each device's detail page for that.
Slot fusing
Slot fusing allows continued playback of identical assets in consecutive slots. For example if you use two fullscreen slots with alternative contents you might use different images as the default content. You can then use the same video file as "Alternative 1" in each slot. When slot fusing is enabled, the video playback won't restart when playback switches to the seconds slot as the same video is assigned there as well.
Similarly if you use overlays and they are active across multiple playlist slots, slot fusing allows continuous playback of those overlays. If slot fusing is disabled, each overlay will restart for each slot. This might make a difference when combined with the fade/reveal option below.
Fade/Reveal effect
The player provide an option for controlling how transitions between content works: Videos and images can fade in/out, while scrollers can move in or out from the sides of the screen. Enabling this option will control the effect for all content and overlays.
Device specific configuration
Some playback settings are not part of the setup itself but part of the device's configuration. Once you assign a setup to a device, go to the device's detail page and scroll down to the "Content Player" section:
Setting you make will be saved and synced to the device when clicking "Save device customization".
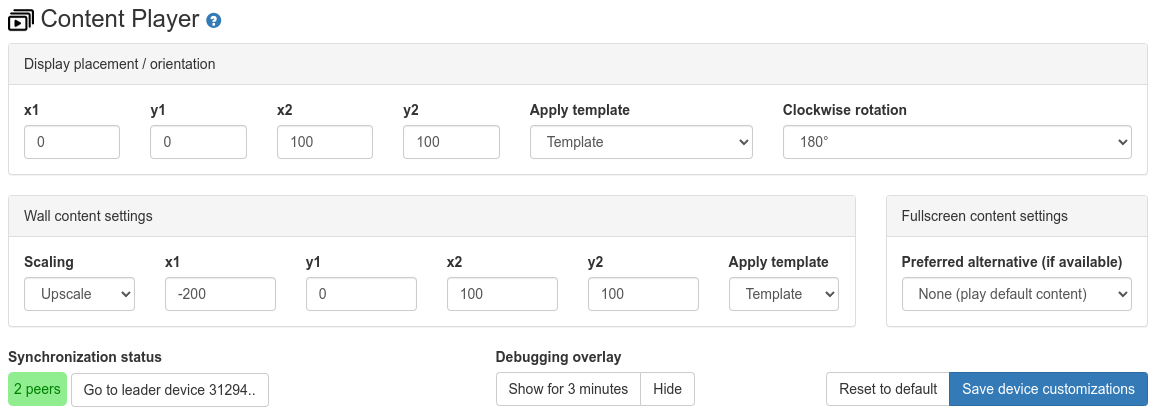
Display placement
The four percent values x1, y1, x2 and y2 can normally left at their
default of 0, 0, 100, 100. They specify an initial transform applied to all
output generated by the setup. By default the complete physical resolution will
be used from the pixel at the very top left (at 0, 0) up to the bottom right
pixel at 100% width/100% height. Some video walls will crop a fixed area from the
top-left of the HDMI video signal a device generates. In that case the x2 and
y2 can be used to place all content within that area. You can also use these
settings to compensate for overscan in case you cannot force your display to show
the complete HDMI output.
The clockwise rotation allows you to rotate all content within the target area defined by the settings above.
Wall content layout
The four values x1, y1, x2 and y2 allow you to specify the screen area
used to display your video wall content. The values are specified on "percent of
available screen space". The default for 0 for x1 and y1 means the top
left corner, while 100 for x2 and y2 is the bottom right corner of the
display. You can specify your own values or use the template dropdown to select
and apply among a selection of presets.
The values do not necessarily have to be between 0 and 100. If you use
values outside of that range, you can, among other things, configure multiple
devices to act as a single screen area for a video wall type setup.
Fullscreen content settings
By default each device will play from the primary default content configured in each fullscreen slot. With this setting you can specify that a device should play the specifed alternative content instead if configured for a slot. In case of a food menu with 3 side-by-side displays it might for example make sense to use the default content for the left display, 'Alternative 1' for the middle display and 'Alternative 2' for the right display. Within a playlist you can then configure alternative content accordingly for each fullscreen slot to specify which display is used for playback.
Alternative content
As already discussed in the playlist configuration above, each playlist slot can specify alternative content. You can use the "Preferred alternative" dropdown to select which of those alternative content the device should play. If a playlist slot doesn't have any configured content for the selected alternative, the device will play the default content instead.
Debugging
You can identify a device and show various debugging values by clicking on the "Identify screen" button. This will show an overlay above the normal content on the device for the next 3 minutes.
Synchronization Status
Multiple devices in the same network running the same setup will automatically form a group of devices. The status shows the device role (leader or follower). Use the "Go to leader" on a follower device to go to the device detail page of the leader device.
Howto
Synchronized playback
Here's how you create a setup that shows different but synchronized content on a group of devices:
- Create the playlist for a single device using the "Add playlist slot.." button.
- Click on "Add alternative asset" on each playlist slot, add the alternative asset for a second display and select "Alternative 1".
- Repeat for each additional display: Add another asset, and select "Alternative 2", etc..
- On each device that should play alternative content, go to the device page after assiging the setup and select the alternative in the dropdown. Then click on "Save device customization".
Video wall
This package can be used to show video wall content across a number of devices. As an example, a 2x2 video wall can be set up as follows:
- Create the playlist using the setup configuration editor and assign the setup to the four devices.
- Go to each device's individual device details page and use the "Apply layout template" dropdown. Select the correct 2x2 option for each of the four devices, then click on "Save device customization".
FAQ
My content isn't synced
This packages uses Peer-to-Peer communication between devices for synchronization. This is necessary due to the potentially complex scheduling of individual items. When a setup is installed on a group of devices in a local network, they automatically select a leader device. This leader device then controls the playback of all other devices running the same setup. A usable network environment is required for this: When you visit a device's detail page, in the Peer-to-Peer information on the right side should show all participating devices. If you only see a single device, this usually means that the device is isolated for some reason and cannot contact other devices. If you're running an installation on a WiFi network, the client isolation feature of WiFi might be the reason for that.
Similarly you can see information about the synchronization of your devices on the 'Content Player' section of each device's detail page. It also shows the number of detected peers for the installed setup. The number should be equal to the number of devices you want to sychronize.
Another reason might be packet loss. The sychronization requires devices talking to each other. If a lot of transmitted information is lost due to packet loss, synchronization might not work and you might see devices reverting back to playing the fallback content.
Be sure the connectivity of the devices is working well: Either use Ethernet, which usually doesn't have this problem, or be sure to use a WiFi network with a strong enough signal.
Changelog
Version beta-2
- Start with first item on initial playback.
- Content-process content (like the browser) show their last frame if their node directory (and service) is deleted due to switching to another setup based on this package. This avoids showing just a black screen.
Version beta-1
- Support explicit start and end time within a schedule specification. This updates is mandatory if you use such a schedule.
Version alpha-6
- Documentation and first release cleanup.
Version alpha-5
- Updated to work together with packages like power saver, if the "Show fallback content" option is selected. When "Turn off display" is selected, the package expects it to be in control of the display though, so you should not mix it with the power saver in that case.
Version alpha-4
- Fixed device status on device detail page not getting updated after one day of device uptime.
Version alpha-3
- Added features to default overlay: It adds some features from the old HD player like Ken burns effect as well as progress indicators.
- Overlay can now loop through l-wraps, bottom/side images or logos placed on top of the main content.
Version alpha-2
- Added optional playlist slot fusing: If you assign the same asset to two or more consecutive playlist slots, the playback for a video won't restart but instead continues across slots.
- Added initial support for content child nodes.
- Added initial support for overlay child nodes.
Version alpha-1
- Initial public release
Want to run HD Image/Video Player V2 on your Raspberry Pi?
This package is ready to run on your Raspberry Pi using info-beamer.com hosted. Easily manage unlimited number of Raspberry Pi devices and centrally configure and run visualizations like this on them. info-beamer.com is a prepaid service. You only pay for the resources you are using. No long term commitment, no hidden fees. Learn more...
Compatible devices
pi-2 pi-3 pi-4 pi-5 pi-cm0 pi-cm3 pi-cm4 pi-cm5 pi-zero-2Compatible packages
This package can be extended by importing the following packages as well. You can then add the following packages as a child package of HD Image/Video Player V2 to get additional features not included in HD Image/Video Player V2 itself.
Plugin: Scroller
Power Saver
Web Browser
Offline support
Maybe This package might work offline: Synced playback will work offline, but scheduling content isn't possible without correct system time. Also check the information above.Source code for this package
https://github.com/info-beamer/package-hdv2-player shows you the full source code of this package so you can freely modify it if you want.Copyright
Copyright (C) 2022 Florian Wesch <fw@info-beamer.com>
Show full license information
Copyright (C) 2022 Florian Wesch <fw@info-beamer.com>

Permission is hereby granted, free of charge, to any person obtaining a copy
of this software and associated documentation files (the "Software"), to deal
in the Software without restriction, including without limitation the rights
to use, copy, modify, merge, publish, distribute, sublicense, and/or sell
copies of the Software, and to permit persons to whom the Software is
furnished to do so, subject to the following conditions:

The above copyright notice and this permission notice shall be included in
all copies or substantial portions of the Software.

THE SOFTWARE IS PROVIDED "AS IS", WITHOUT WARRANTY OF ANY KIND, EXPRESS OR
IMPLIED, INCLUDING BUT NOT LIMITED TO THE WARRANTIES OF MERCHANTABILITY,
FITNESS FOR A PARTICULAR PURPOSE AND NONINFRINGEMENT.  IN NO EVENT SHALL THE
AUTHORS OR COPYRIGHT HOLDERS BE LIABLE FOR ANY CLAIM, DAMAGES OR OTHER
LIABILITY, WHETHER IN AN ACTION OF CONTRACT, TORT OR OTHERWISE, ARISING FROM,
OUT OF OR IN CONNECTION WITH THE SOFTWARE OR THE USE OR OTHER DEALINGS IN
THE SOFTWARE.


This project includes third party work:

package.png:
   Icon created by John T. Garcia (https://thenounproject.com/tongal/)

font.ttf:
    Ubuntu Condensed Regular:
    https://en.wikipedia.org/wiki/Ubuntu_(typeface)
    https://ubuntu.com/legal/font-licence
