OMX vs CPU jpeg decoding
Posted Oct 24 2015 by Florian WeschThere are multiple ways of loading JPEG images on the Pi. OMX (hardware acceleration) and using the host CPU. This blog post compares those two options on the Pi1 and Pi2.
How to decode JPEG files on the Raspberry Pi
There are multiple ways to decode JPEG image files in the Raspberry Pi. The obvious solution is to use a library like libjpeg and decode the file into a memory buffer, then upload it to a GPU texture.
Doing so is limited by the CPU performance. Since images are decoded in background threads decoding can be parallelized using all available cores. The first Pi only had a single core, so there isn't a lot to gain from background threads. The Pi2 on the other hand has 4 cores so multiple images can be decoded at the same time.
Another way of decoding images is using the hardware features provided by the Raspberry Pi. Using OpenMAX (aka OMX) it is possible to use buit-in hardware features. OMX works by setting up a decoding pipeline and feeding that pipeline with raw image data. The pipeline provides the decoded image in RGBA format on its output port. All that needs to be done is upload that image data to the GPU.
Multiple threads allow decoding to be done in parallel to uploading decoded data of another image in another thread.
For performance reasons info-beamer uses libjpeg-turbo to decode images. libjpeg-turbo automatically uses the Neon instruction set available on the Raspberry Pi 2 to make decoding faster on the CPU.
The new info-beamer 0.9.4 release will bring back GPU decoding for JPEG images. So it's time to find out if that's worth it. To do that I wrote info-beamer Lua code that decodes 640x480 JPEG files in a loop and measures the number of successful image decodes per second.
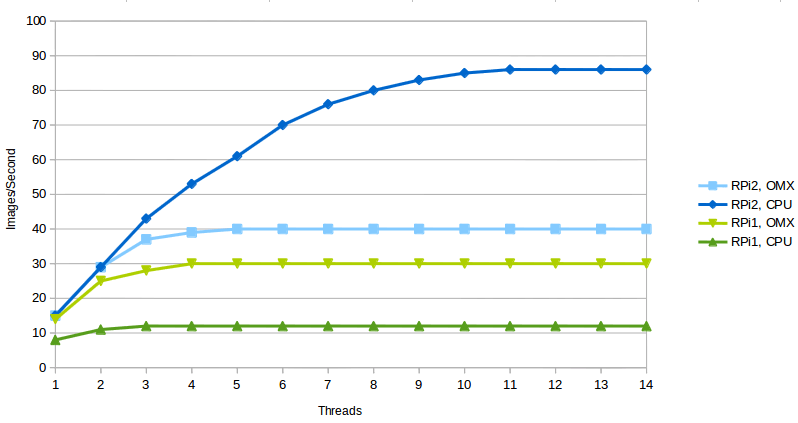
Let's have a look at the graph:

As you can see there is a big difference between the Raspberry Pi 1 and the newer Raspberry Pi 2. On the Raspberry Pi 1 using the GPU almost triples the JPEG decoding performance. Also noticeable is the small increase between using a single thread and more than four threads. The explanation for that is probably that image decoding and uploading to the CPU can be done in parallel. Decoding on the Raspberry Pi 1 maxes out at 30 images per second. It seems that using the hardware decoder is useful.
Things look different on the Raspberry Pi 2. Using hardware decoding is about 33% faster (40 compared to 30). Probably due to a higher clock rate? I'm not entirely sure about this. Noticable is also that using the CPU to decode is a lot fast when using more threads. While using OMX maxes out at 40 images per second, using the CPU more than doubles that with 85 images per second. The huge improvement compared to the Raspberry Pi 1 is a result of more cores (four compared to a single core on the Raspberry Pi 1) and the NEON optimizations in libjpeg-turbo. So it seems that using hardware decoding isn't really useful on the Raspberry Pi 2.
Therefore info-beamer now uses hardware decoding on the Raspberry Pi 1 for images larger than 512x512 pixels. For smaller images the setup costs of using hardware decoding aren't worth it. On the Raspberry Pi 2 hardware decoding isn't used since software decoding is just as fast and gets faster if multiple images are loaded at once.
If you want to adjust those default behaviour you can set the new environment variable INFOBEAMER_HW_JPEG. Setting it to
INFOBEAMER_HW_JPEG=always
will force info-beamer to use hardware decoding. Setting the variable to
INFOBEAMER_HW_JPEG=never
will prevent info-beamer from using hardware decoding at all. Progressive JPEG files are always decoding on the CPU since they cannot be decoded using OMX.
Feedback on the new OMX support is more than welcome. Please get in contact if you have any problems with the new OMX decoding feature.
Read more...
Recent blog posts
info-beamer hosted 16 releasedinfo-beamer hosted 15 released
info-beamer hosted 14 released
info-beamer hosted 13 released
More blog posts...
Learn more about info-beamer.com
The info-beamer hosted digital signage platformThe info-beamer pi software
Sign up to info-beamer hosted
info-beamer.com offers the most advanced digital signage platform for the Raspberry Pi. Fully hosted, programmable and easy to use. Learn more...
Get started for free!
Trying out the best digital signage solution for the Raspberry Pi is totally free: Use one device and 1GB of storage completely free of charge. No credit card required.
Follow @infobeamer on Mastodon to get notified of new blog posts and other related info-beamer news. It's very low traffic so just give it a try.
You can also subscribe to the
![]() RSS feed.
RSS feed.
Questions or comments?
Get in contact!

