
Touch UI experiments
info-beamer touch UI experiments
Before you proceed: This is nowhere near finished and the UI isn't pretty. But it shows how you might build interfaces on your info-beamer hosted devices with very little code in the future.
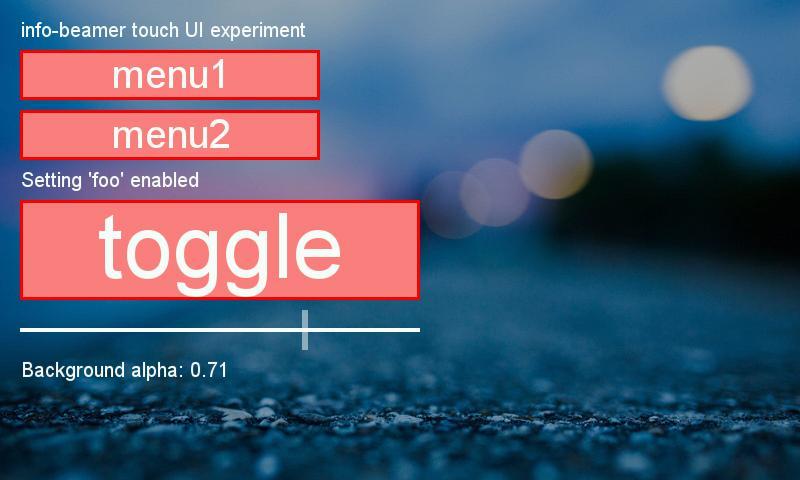
This repository shows how a touch interface running on info-beamer hosted might work. Right now it's quite ugly and there are only three widgets implemented. If you're able to ignore that, you might find some interesting concepts used in the experiment. You can play around with this package right now:
Immediate mode GUI
Graphical user interfaces libaries all expect you to create widgets, place them, manage their lifecycle, hide and show them at the correct time and handle their events.
Immediate mode GUIs make this a bit easier as you directly write and handle events where they happen. Here's an example:
-- define button and its state
local btn = {
    text = "toggle";
}

-- using it later is as simple as
if ui.button(btn, layout.row(400, 100)).clicked then
    enable_foo = not enable_foo
end
If you need not conditionally show interface elements just
use them inside if. So you don't need to explicitly show/hide
interface elements. Instead you call or don't call them:
if enable_foo then
    ui.label({
        text = string.format("Background alpha: %.2f", background_alpha.value)
    }, layout.row(760, 20))
end
Coroutine and tail-called based flow
Usually when you create interfaces with multiple different pages
you have to keep the state of where your user is somewhere. This
might be in variables (e.g. current_page = pages.SETTINGS or similar).
This experiments uses coroutines combined with the Lua tail-call
feature instead to make things even easier:
function main_menu()
    local child_btn = {
        text = "Goto child menu";
    }
    while ui.loop() do
        if ui.button(child_btn, layout.row(300, 50)).clicked then
            return child_menu()
        end
    end
end

function child_menu()
    local main_btn = {
        text = "Goto back to main menu";
    }
    while ui.loop() do
        if ui.button(main_btn, layout.row(300, 50)).clicked then
            return main_menu()
        end
    end
end

ui = UI{
    entry = main_menu;
}

function node.render()
    layout.reset(20, 20, 20, 10)
    ui.run() -- show current user interface
end
This is example code that shows a button to enter a "sub menu" and
from there return to the "main menu". Altough both main_menu and
child_menu might all each other indefinitely, thanks to the
tail call optimization this
doesn't result in a stack overflow.
Additionally both menus seems to be causing an endless while loop.
Under the hood, the coroutine feature of Lua
is used. ui.run resumes the coroutine started at main_menu and
ui.loop yields from the coroutine back to ui.run. Together this
creates the illusion of an endlessly running UI that can immediately
respond to (user) input.
Building widgets
Creating new widgets should be easy as well. Here's how a slider looks like at the moment.
local function slider(ui, state, x1, y1, x2, y2)
    state = ui.get_state(state)
    local w = x2 - x1
    local cy = y1 + (y2 - y1) / 2

    local value = state.value or 0
    local mode = state.mode or "idle"
    local before = value

    if mode == "idle" and ui.touched(x1, y1, x2, y2) then
        mode = "change"
    elseif mode == "change" and not ui.touched() then
        mode = "idle"
    end

    if mode == "change" then
        local x, y = ui.touch_pos()
        value = clamp(0, 1, (x - x1) / w)
    end

    white:draw(x1, cy-2, x2, cy+2)
    local x = x1 + w * value
    white:draw(x-3, y1, x+3, y2, .5)

    state.mode = mode
    state.value = value
    state.changed = value ~= before
    return state
end
Basically all widgets right now follow the same idea:
local function slider(ui, state, x1, y1, x2, y2)
    -- get current widget state
    -- modify current widget state
    -- draw the widgets
    -- update and return widget state
end
Playing around with this code
You can import this code into your info-beamer hosted account by clicking this button:
You need a supported touch device. Right now that's either the official 7" Pi display or the CM3 PANEL.
If you want to edit and extend this code, you should use the dev-mode feature so you can directly see changes you make to the code on your info-beamer hosted device.
Want to run Touch UI experiments on your Raspberry Pi?
This package is ready to run on your Raspberry Pi using info-beamer.com hosted. Easily manage unlimited number of Raspberry Pi devices and centrally configure and run visualizations like this on them. info-beamer.com is a prepaid service. You only pay for the resources you are using. No long term commitment, no hidden fees. Learn more...
Compatible devices
pi-1 pi-2 pi-3 pi-cm0 pi-cm1 pi-cm3 pi-zero pi-zero-2Offline support
Maybe This package might work offline: Package provides no offline support information. Also check the information above.Source code for this package
https://github.com/info-beamer/package-touch-ui-experiments shows you the full source code of this package so you can freely modify it if you want.Copyright
Copyright (C) 2018 Florian Wesch <fw@info-beamer.com>
Show full license information
Copyright (C) 2018 Florian Wesch <fw@info-beamer.com>

Permission is hereby granted, free of charge, to any person obtaining a copy
of this software and associated documentation files (the "Software"), to deal
in the Software without restriction, including without limitation the rights
to use, copy, modify, merge, publish, distribute, sublicense, and/or sell
copies of the Software, and to permit persons to whom the Software is
furnished to do so, subject to the following conditions:

The above copyright notice and this permission notice shall be included in
all copies or substantial portions of the Software.

THE SOFTWARE IS PROVIDED "AS IS", WITHOUT WARRANTY OF ANY KIND, EXPRESS OR
IMPLIED, INCLUDING BUT NOT LIMITED TO THE WARRANTIES OF MERCHANTABILITY,
FITNESS FOR A PARTICULAR PURPOSE AND NONINFRINGEMENT.  IN NO EVENT SHALL THE
AUTHORS OR COPYRIGHT HOLDERS BE LIABLE FOR ANY CLAIM, DAMAGES OR OTHER
LIABILITY, WHETHER IN AN ACTION OF CONTRACT, TORT OR OTHERWISE, ARISING FROM,
OUT OF OR IN CONNECTION WITH THE SOFTWARE OR THE USE OR OTHER DEALINGS IN
THE SOFTWARE.


This project includes third party work:

layout.lua:
    Part of SUIT:
    https://github.com/vrld/suit

    Copyright (c) 2016 Matthias Richter

    Permission is hereby granted, free of charge, to any person obtaining a copy
    of this software and associated documentation files (the "Software"), to deal
    in the Software without restriction, including without limitation the rights
    to use, copy, modify, merge, publish, distribute, sublicense, and/or sell
    copies of the Software, and to permit persons to whom the Software is
    furnished to do so, subject to the following conditions:

    The above copyright notice and this permission notice shall be included in
    all copies or substantial portions of the Software.

    Except as contained in this notice, the name(s) of the above copyright holders
    shall not be used in advertising or otherwise to promote the sale, use or
    other dealings in this Software without prior written authorization.

    THE SOFTWARE IS PROVIDED "AS IS", WITHOUT WARRANTY OF ANY KIND, EXPRESS OR
    IMPLIED, INCLUDING BUT NOT LIMITED TO THE WARRANTIES OF MERCHANTABILITY,
    FITNESS FOR A PARTICULAR PURPOSE AND NONINFRINGEMENT. IN NO EVENT SHALL THE
    AUTHORS OR COPYRIGHT HOLDERS BE LIABLE FOR ANY CLAIM, DAMAGES OR OTHER
    LIABILITY, WHETHER IN AN ACTION OF CONTRACT, TORT OR OTHERWISE, ARISING FROM,
    OUT OF OR IN CONNECTION WITH THE SOFTWARE OR THE USE OR OTHER DEALINGS IN
    THE SOFTWARE.
