Playing a video on multiple screens
Posted Jun 28 2015 by Florian WeschThis is a walkthrough on how to use info-beamer as a multiscreen video player.
Each of the screens has to have its own Raspberry PI running info-beamer to display parts of the video. The full source is available on github.
Setting up the screens
This setup assumes that you want to play a single "virtual" video and that is then visualized using multiple screens that cover the area of that video.
An example: You setup a virtual video sized 120cm x 70cm. You can then use four 27" screens arranged in a 2x2 grid to cover this area. Each of those monitors will then show one quadrant of the video.
Or you can have a 100cm x 100cm video (the video file should have 1:1 aspect ratio then) and place 10 screens freely arranged and tilted. Once you have created a configuration that captures the screen setup, each of them will display the correct region of the video.
Creating a configuration shouldn't be too hard. There is a configuration tool provided in index.html. Just open it with a browser.
Using the configuration tool
You can use an online version of the configuration tool here: https://info-beamer.github.io/multiscreen/

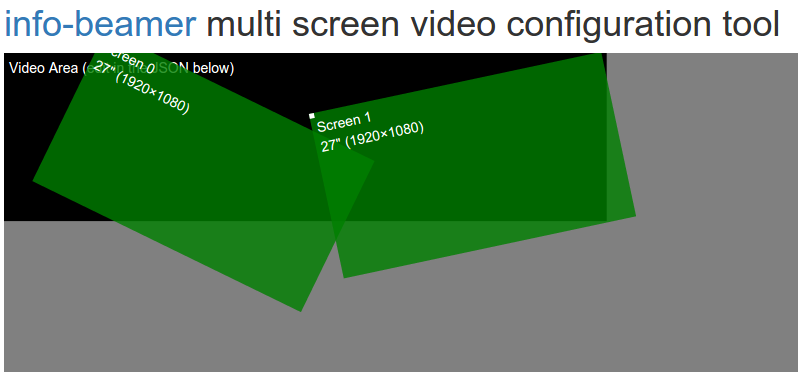
In the upper area you see the current setup. The dark area represents the virtual video area. The are multiple screens that cover this area.
To change your screen setup, just move the screens around by drag-/dropping them. You can tilt them by hovering over them and using your mouse wheel.
Below in a text area you'll find the representation of this setup written as JSON.
This configuration is in sync with the graphical representation, so you can make changes in both of them and the other will reflect those changes.
To change the size of the video area you have to edit the JSON by hand. Just change the values of width and height in the video section to the size in centimeters.
You can change screen sizes as well as there resolution in the JSON text: Just edit the values width, height and inches to match the screens you want to use.
Once you have finalized your setup, save it by clicking the Download button and save the file screens.json.
To edit an existing configuration, just open the previously saved screens.json file (using for example notepad) and copy the text into the text area of the configuration page. You can then start editing it.
Preparing the PIs
You have to repeat this step for each Pi you want to use.
Install Raspbian. Download info-beamer for the pi. and extract the tar.gz somewhere. This blog post assumes you extracted the tar to /root/info-beamer-pi.
Please follow the instructions in /root/info-beamer-pi/README.txt to make sure your Pi has enough video memory available. You can test info-beamer by running:
$ /root/info-beamer-pi/info-beamer /root/info-beamer-pi/samples/hello
This tutorial also assumes that you extracted all multiscreen files (node.lua, master.py, ...) in /root/multiscreen.
Copy the videos(s) you want to display to the directory /root/multiscreen. Only h264 videos aresupported. For the best performance it's recommended to use SD (1280x720) videos. Higher resolutions might not play smoothly.
Create the file playlist.txt and add the filenames of each video you want to play. It might look like this:
video1.mp4
video2.mp4
Making sure info-beamer starts after booting
Edit /etc/rc.local and add the following line before the existing exit 0 line:
INFOBEAMER_ADDR=0.0.0.0 /root/info-beamer-pi/info-beamer /root/multiscreen &
This will start info-beamer each time the Pi starts. Make sure you have ssh access configured for the Pi, otherwise the screen will be black after booting since info-beamer will show a black screen while waiting for video playback.
Be careful: This setup assumes that your network is trusted. Any machine in the same network can control which of the provided videos is displayed on each screen.
Starting playback
Once all PIs are configured it's time to start playing videos. One of the PIs (or any other computer) will act as the master server that coordinates playback.
This tutorial assumes that one of the previously configured PIs acts as the master.
Copy the screens.json file generated by the configuration tool to /root/multiscreen.
Assuming your screens.json is configured for *two* screens, run master.py like this:
cd /root/multiscreen
python master.py screens.json playlist.txt 192.168.1.50 192.168.1.51
This assumes that the PI for the first screen configured uses the IP address 192.168.1.50 and the second one uses 192.168.1.51. Yours probably have other IP addresses, so be sure to change those values.
If this is running successfully you might want to add those lines to /etc/rc.local as well. It might look like this (be sure to change the IP addresses as well as there number to match your setup) on the master PI now:
INFOBEAMER_ADDR=0.0.0.0 /root/info-beamer-pi/info-beamer /root/multiscreen &

cd /root/multiscreen
python master.py screens.json playlist.txt 192.168.1.50 192.168.1.51 &
Once that's done your PIs should display the video. For a more reliable setup, have a look at the blog post about running info-beamer in production.
Let me know if you have questions or feedback.
Read more...
Recent blog posts
info-beamer hosted 16 releasedinfo-beamer hosted 15 released
info-beamer hosted 14 released
info-beamer hosted 13 released
More blog posts...
Learn more about info-beamer.com
The info-beamer hosted digital signage platformThe info-beamer pi software
Sign up to info-beamer hosted
info-beamer.com offers the most advanced digital signage platform for the Raspberry Pi. Fully hosted, programmable and easy to use. Learn more...
Get started for free!
Trying out the best digital signage solution for the Raspberry Pi is totally free: Use one device and 1GB of storage completely free of charge. No credit card required.
Follow @infobeamer on Mastodon to get notified of new blog posts and other related info-beamer news. It's very low traffic so just give it a try.
You can also subscribe to the
![]() RSS feed.
RSS feed.
Questions or comments?
Get in contact!

