
Understanding Pi dispmanx/HVS
Posted Apr 10 2015 by Florian Weschinfo-beamer 0.9 will offer an additional way of displaying videos. To use it it's important to understand how the Raspberry produces a video signal. This first blog post will walk you through all the steps your Pi is taking.
- This blog post was updated Sep 30 2015 to include a new vcgencmd command
Generating output on the Pi
The output you see on a screen connected to your raspberry is produced by the HVS (hardware video scaler) unit of your Pi. This piece of hardware is responsible for taking several layers of output and producing a single video signal. Dispmanx is an API that wraps the HVS.
If you didn't configure your Pi to automatically start X you are normally getting a screen like this once your Pi booted:
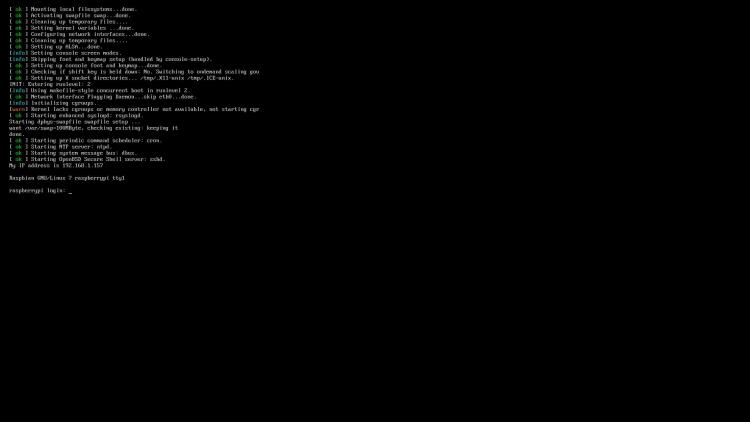
What you see is already a layer. Or to be more precise: It's the linux framebuffer that is rendered into dispmanx layer -127. The framebuffer normally fills almost the complete screen. Let's add another layer of output to the screen. Start info-beamer like this:
pi@raspberrypi ~/info-beamer-pi $ INFOBEAMER_TRANSPARENT=1 ./info-beamer samples/shader
...
I'm assuming a 16:9 screen for my walkthrough. If you have another screen aspect ratio your output might differ. On a 16:9 screen this will produce output that will probably look like this:

The shader info-beamer node is scaled to cover the maximum area on the screen while still keeping the aspect ratio. Since the shader node is 1024x768 it's covering the center of the screen. Notice that you can still see the console in the background.
Another way to look at this is shown in the following image. Basically the image you see on the screen consists of two layers on top of each other:
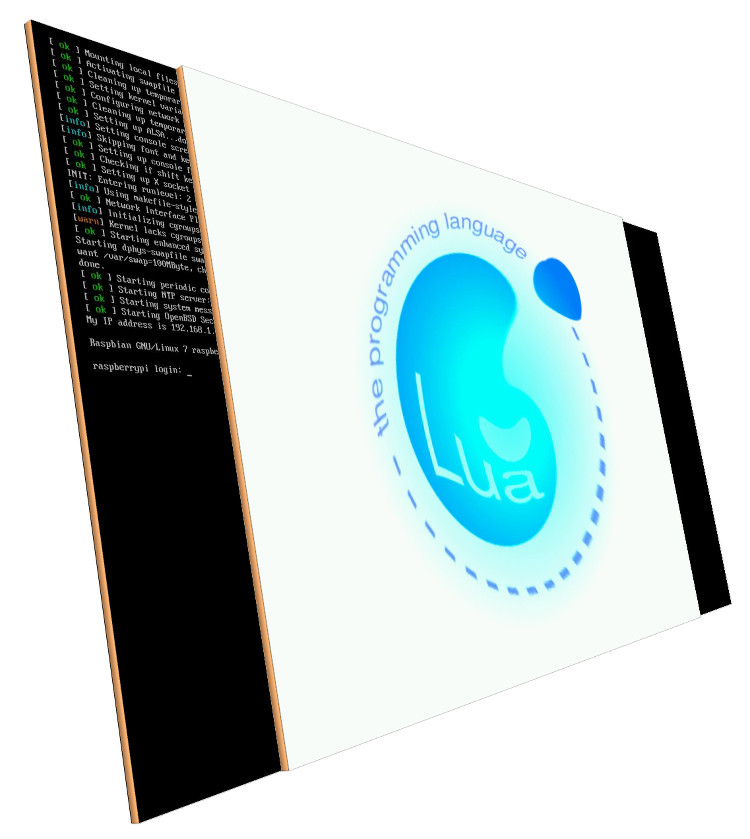
These two logical layers are configured like this: The 1920x1080 framebuffer layer created by the linux kernel at layer -127. And the info-beamer OpenGL layer with 1024x768 pixels scaled up to 1440x1080 pixels centered on the screen at layer 0.
The Hardware Video Scaler (HVS)
Given those two buffers, their coordinates and layer information the hardware video scaler can now produce the output: It traverses the screen by iterating over the screen first from left to right, then top to bottom.
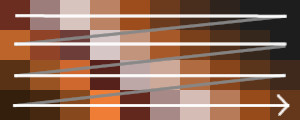
For each pixel the HVS has to decide which color to output on the screen. A naive approach would basically do the following:
for y from 0 to 1080:
    for x from 0 to 1920:
        color = black
        for layer in sorted(layers):
            if layer.covers(x, y):
                layer_color = layer.get_color_at(x, y)
                color = blend(color, layer_color)
        output_color(color)
This algorithm is really slow and the real hardware scaler uses a better algorithm, but the general idea is the same: Generate 1920×1080 = 2073600 pixels for each frame of output composed from the currently active layers. The scaler has to do this every time a new frame is sent to the screen. Normally that's 60 times per second.
As you can guess that's quite a lot of pixels the hardware scaler has to look at each second. For a 60Hz screen that's only 16ms per frame. Normally the hardware scaler sends its output directly to the connected screen. So it's important that each pixel is generated fast enough. If you define too many layers it might happen that the scaler just can't keep up. The result is a lost video signal since the video output is then missing information about pixel colors. You can prevent this problem by adding dispmanx_offline=1 to /boot/config.txt. The HVS will then render into an offscreen buffer. But you should only do that if absolutely necessary as it reduces the frame rate. It's better to support the hardware video scaler at its job. For doing that it's important to know its performance properties:
- Unscaled layers are cheaper than scaled. So a 1920x1080 info-beamer layer might be faster than a 1600x900 layer scaled to 1920x1080. When the layer size equals the screen size the HVS basically can just use each pixel directly without interpolating its color from its neighbours.
- Horizontal scaling is cheaper than vertical scaling. When scaling vertically the scaler has to access pixels in the previous line in order to interpolate the current pixel color. When scaling horizontally it only has to access the previous pixel.
- Layers which overlap on a single horizontal line are more expensive. So for example the three layers on the left can be composed faster than the three layers on the right:

The reason for that is that the scaler traverses the screen row by row from top to bottom. Each line of output for the left layer configuration only involves a single layer to look into. When multiple layers all occupy a single horizontal row it has to switch between all of them for each line.
To get the best performance and to avoid eating all available memory bandwidth it's important to reduce the number of active layers and avoid expensive configurations. So how is this all related to info-beamer?
info-beamer version before 0.9 used two layers. One layer is the OpenGL layer where all fonts, images and normal videos are rendered into. The other layer is a single 1x1 pixel black background layer that is put behind the OpenGL layer. This layer prevents the console output (a third) layer from being visible. Remember the previous image. Let's start info-beamer to add this extra layer:
pi@raspberrypi ~/info-beamer-pi $ INFOBEAMER_BLANK_MODE=layer ./info-beamer samples/shader
...

As you can see there is a new layer between the console layer (at -127) and the info-beamer OpenGL layer at 0: the black background layer at -10 which prevents the normal console output from being visible.
Getting more insights into what the HVS is doing
Hopefully soon there will be a new vcgencmd command that you can call to get more information about the current configured layers and information about what the HVS is doing. Try calling:
root@raspberrypi $ vcgencmd dispmanx_list
display:2 format:RGB565 transform:0 src:0,0,1872,1048 dst:24,16,1872,1048 cost:869 lbm:0
display:2 format:RGB565 transform:0 src:0,0,1,1 dst:0,0,0,0 cost:1186 lbm:1024
display:2 format:RGBA32 transform:20000 src:0,0,1920,1080 dst:0,0,1920,1080 cost:1156 lbm:0
You can see that there are currently three layers active. The first one is the framebuffer layer, then you see a 1x1 pixel layer that info-beamer created to hide the background. And finally you see the OpenGL layer info-beamer uses.
cost is an estimated cost value that the HVS estimated. If you go above a certain limit you risk that the HVS can't keep up and you'll lose the output signal. There is no hard limit, since that depends on various factors. See this issue for a discussion about this.
display is the display this layer is drawn onto. The PI supports both HDMI or DSI in parallel. Display 2 is the normal HDMI output. If you use the official 7" display it will show up as display 0.
Reducing the number of layers
Since version 0.9 info-beamer offers another way to most likely archieve the same result: info-beamer can blank and disconnect the normal framebuffer. This mean that the linux console is connected to an invisible dummy console while info-beamer is running. To do that, info-beamer needs to run as root. Start it like this:
root@raspberrypi $ INFOBEAMER_BLANK_MODE=console ./info-beamer samples/shader
...
The visible result should be the same but in the background the HVS has to render one layer less. This frees up resources that can then be used to render other layers. Console blanking is the new default mode since info-beamer 0.9.
In a future blog post (follow @infobeamer on twitter to get notified when it's out) I'll talk about how to render videos into their own layer. While rendering videos that way has its downsides (for example you can't freely rotate them or apply shader effects) it allows a fully smooth FullHD playback. Previously info-beamer only added a maximum of two layers - the black background and the normal OpenGL layer. So there was no way to overload the HVS. The only problem that might happen is a sluggish playback for high resolution videos. The possibility to add videos in their own layer changes this. It's important to understand the limitations of the HVS in order to avoid losing the video signal. I hope this blog post helped with that. See you in the next one.
Read more...
Recent blog posts
info-beamer hosted 16 releasedinfo-beamer hosted 15 released
info-beamer hosted 14 released
info-beamer hosted 13 released
More blog posts...
Learn more about info-beamer.com
The info-beamer hosted digital signage platformThe info-beamer pi software
Sign up to info-beamer hosted
info-beamer.com offers the most advanced digital signage platform for the Raspberry Pi. Fully hosted, programmable and easy to use. Learn more...
Get started for free!
Trying out the best digital signage solution for the Raspberry Pi is totally free: Use one device and 1GB of storage completely free of charge. No credit card required.
Follow @infobeamer on Mastodon to get notified of new blog posts and other related info-beamer news. It's very low traffic so just give it a try.
You can also subscribe to the
![]() RSS feed.
RSS feed.
Questions or comments?
Get in contact!

